In this blog post, we’ll explore Windows Autopatch, which became generally available (GA) in July 2022 for customers with Windows 10/11 Enterprise E3 (or higher) at no additional costs. Because this new Microsoft cloud service supports Windows 365 Enterprise Cloud PCs, it got my full attention and curiosity about the opportunities it brings for organizations and IT pros.
So, in this deep dive post, we’ll look into how to configure Windows Autopatch from scratch, register Windows 365 Enterprise Cloud PCs directly to the Windows Autopatch during its provisioning process, and where to monitor update deployments and device health afterward.
What is Windows Autopatch?
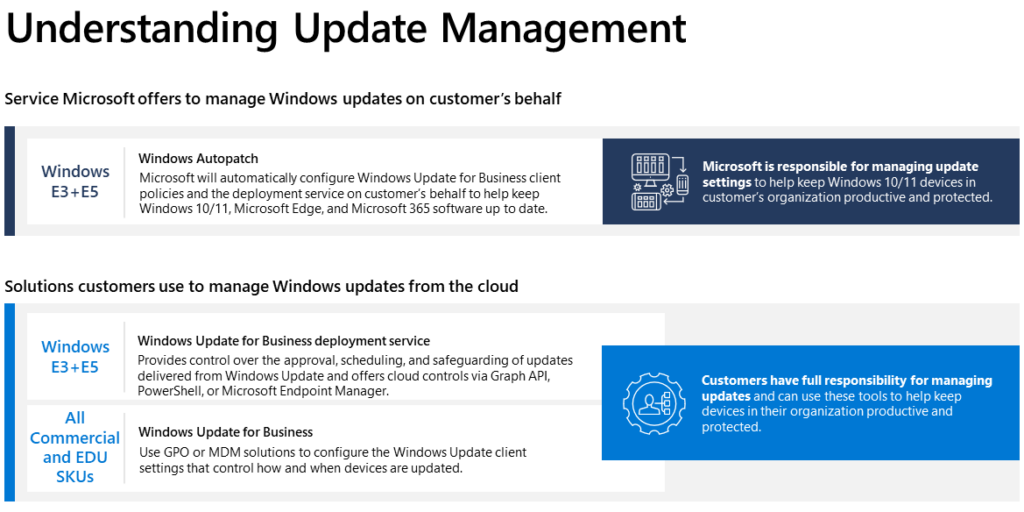
Windows Autopatch is a Microsoft cloud service that manages updates for Windows 10/11, Microsoft 365 Apps, Microsoft Edge, and Microsoft Teams on behalf of the customer. Microsoft engineers use the Windows Update for Business client policies and deployment service tools on the customer’s behalf. The service creates four update rings (Test, First, Fast and Broad) and monitors rollouts-pausing and even rolling back changes where possible.
Have you been asked to do more with less? – With Windows Autopatch, IT pros can gain more time and resources to drive value for the business, and the second Tuesday of every month will be “just another Tuesday”.
Prerequisites
- Azure Active Directory (Azure AD)
- Hybrid Azure AD-Joined or Azure AD-joined only
- Microsoft Intune
- Supported Windows 10/11 Enterprise and Professional editions:
- Windows 10 (1809+)/11 Pro x64 architecture
- Windows 10 (1809+)/11 Enterprise x64 architecture
- Windows 10 (1809+)/11 Pro for Workstations x64 architecture
- Devices must be corporate-owned. Windows bring-your-own-devices (BYOD) is not supported.
- Devices must be managed by either Microsoft Intune or Configuration Manager Co-management.
- Devices must have communicated with Microsoft Intune in the last 28 days.
- Devices must have internet connectivity.
- Devices must have a Serial number, Model, and Manufacturer.
- Connectivity to multiple Microsoft service endpoints from the corporate network.
For the full list of required IPs and URLs, see Microsoft Docs
Configuration Manager Co-management requirements:
- Configuration Manager (version 2010 or later)
- Configuration Manager is connected to the internet and cloud-attach with Intune.
- Configuration Manager is configured for Co-management.
- In Configuration Manager, switch workloads for Device configuration, Office Click-to-Run apps, and Windows Update policies from Configuration Manager to Pilot Intune or Intune.
Licensing Requirements
- Windows 10/11 Enterprise E3 (or higher)
- Licenses that grant entitlement to Windows Autopatch:
- Microsoft 365 E3
- Microsoft 365 E5
- Windows 10/11 Enterprise E3
- Windows 10/11 Enterprise E5
- Windows 10/11 Enterprise VDA
- Licenses that grant entitlement to Windows Autopatch:
- Azure AD Premium
- Microsoft Intune
Are you looking for Windows 365 Enterprise prerequisites and how to get started? – See the How to configure Windows 365 Enterprise in Microsoft Endpoint Manager blog post.
Enroll Your Tenant to Windows Autopatch
Important
You must be a Global Administrator to run the Readiness assessment tool and enroll your tenant.
Once we have reviewed all the prerequisites, we’ll have to run the Windows Autopatch Readiness assessment tool from the Microsoft Endpoint Manager admin center. – The Readiness Assessment tool checks various settings (For example, Update Rings for Windows 10 or later, Conditional Access, Windows Autopatch Service Accounts, Security Defaults, etc.) in Microsoft Intune and Azure AD to ensure they’ll work with Windows Autopatch.
Go to https://endpoint.microsoft.com
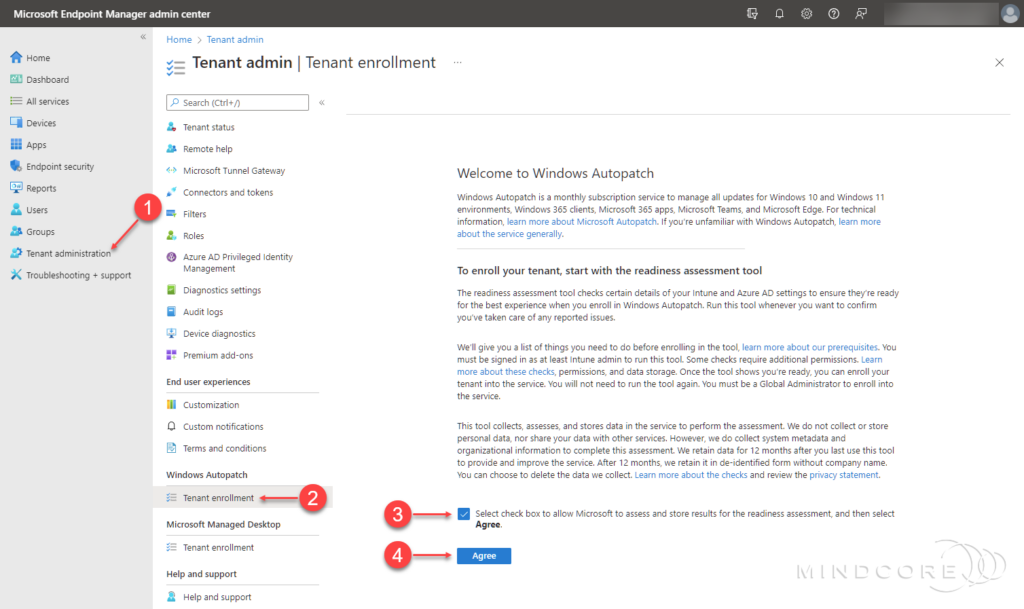
In the left pane, click Tenant administration | Windows Autopatch | Tenant enrollment
Tick the check box and then select Agree.
Important
If you can’t find the Tenant enrollment blade for Windows Autopatch, it’s probably because you don’t meet the prerequisites or the proper licenses. – See the Windows Autopatch prerequisites.
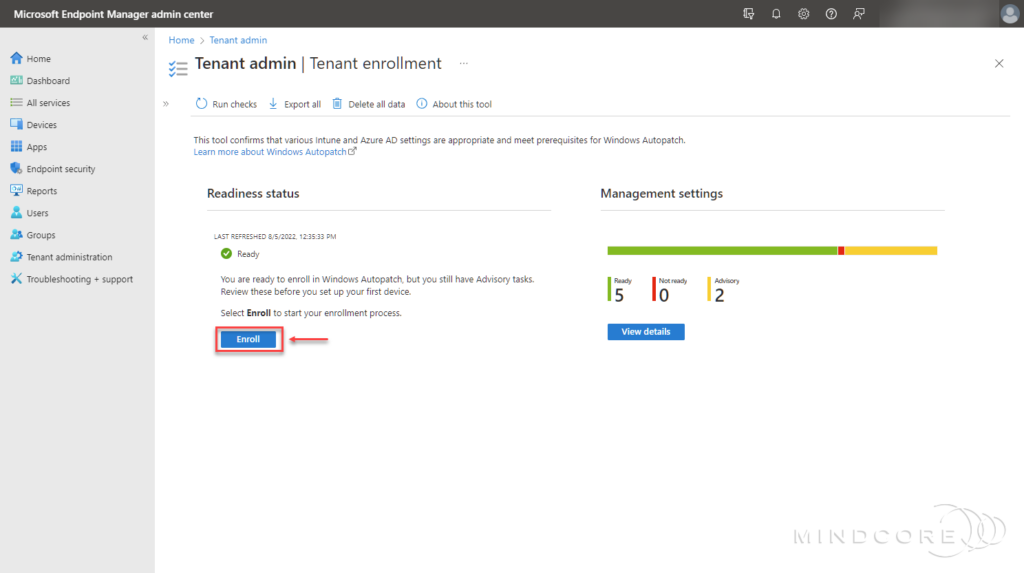
This assessment only takes a few moments, and you can investigate the details by selecting View details.

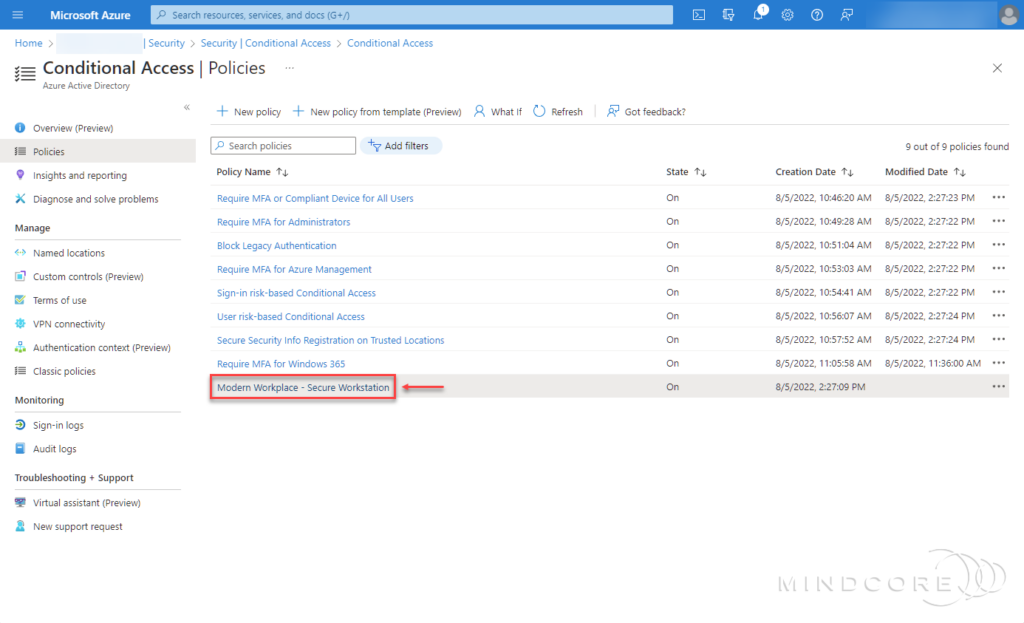
So, the details tell us that there are two advisories based on the readiness assessment. One advisory is about Co-Management workloads, and the other is about my Conditional Access policies that are assigned to all users, which according to MS Docs, isn’t the best practice for Windows Autopatch.
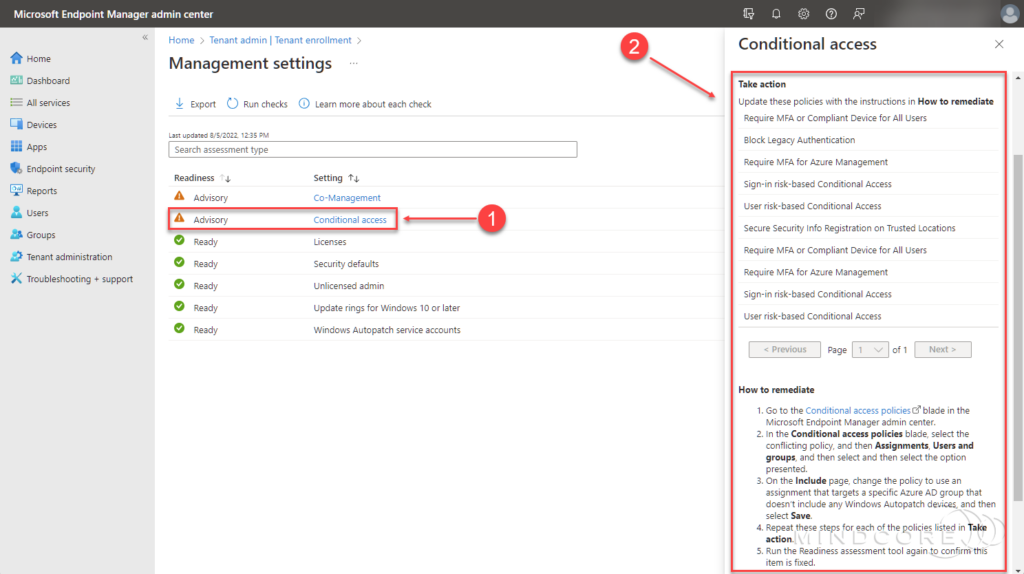
Windows Autopatch does come with a step-by-step explanation on how to remediate this directly within the advisory itself. However, a note states that Windows Autopatch will attempt to exclude their service accounts from my Conditional Access policies during the Windows Autopatch enrollment process.
Note
During the Windows Autopatch enrollment process, the service will attempt to exclude our service accounts from relevant Conditional Access policies and apply new Conditional Access policies to restrict access to these accounts. However, if we are unsuccessful, Windows Autopatch will contact you to exclude the service account from any conflicting Conditional Access policies.
Instead of following the advisory, let’s try and see if their service account will be excluded automatically from my Conditional Access policies during the Windows Autopatch enrollment process.
Still on the assessment details page, click the upper right cross to return to the Tenant enrollment blade.
Select Enroll.
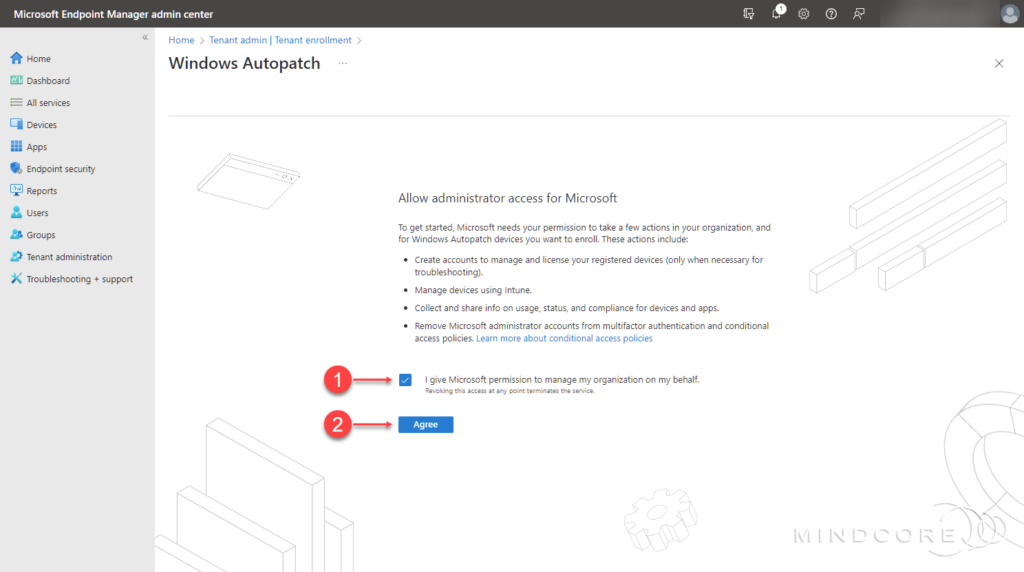
Windows Autopatch needs your consent to allow administrator access for Microsoft. By doing so, you are allowing Windows Autopatch the ability to create Service Accounts, Azure AD Groups, Collect data, etc.
Tick the check box and then select Agree.
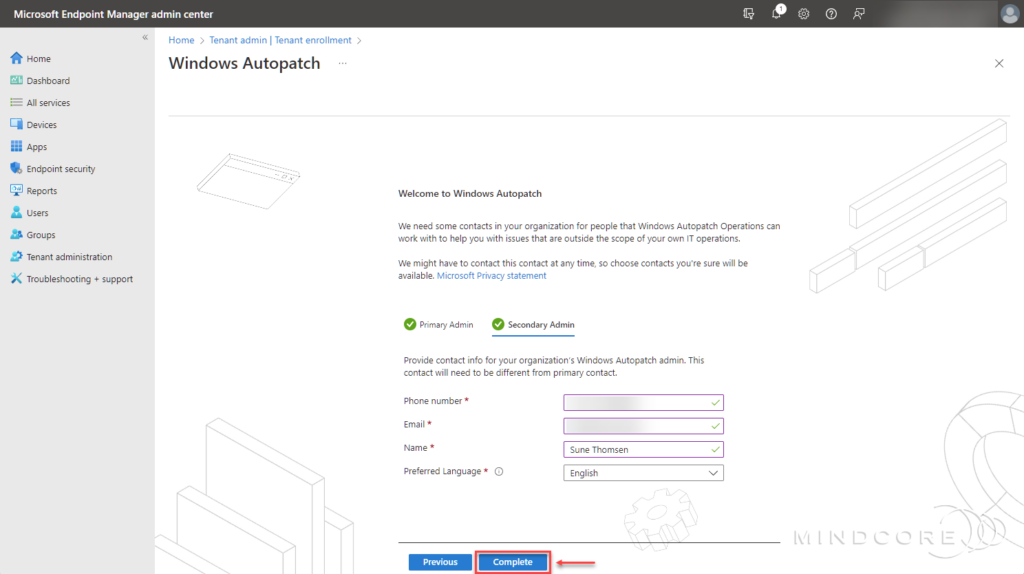
Fill in the required contact information and click Complete.
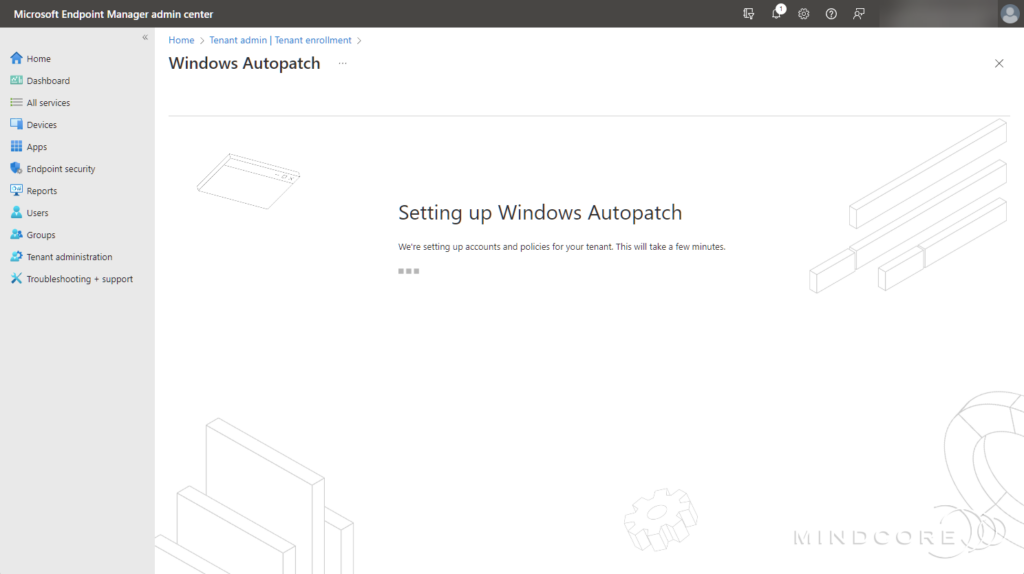
This will kick off the Windows Autopatch enrollment process, which may take some time to complete.
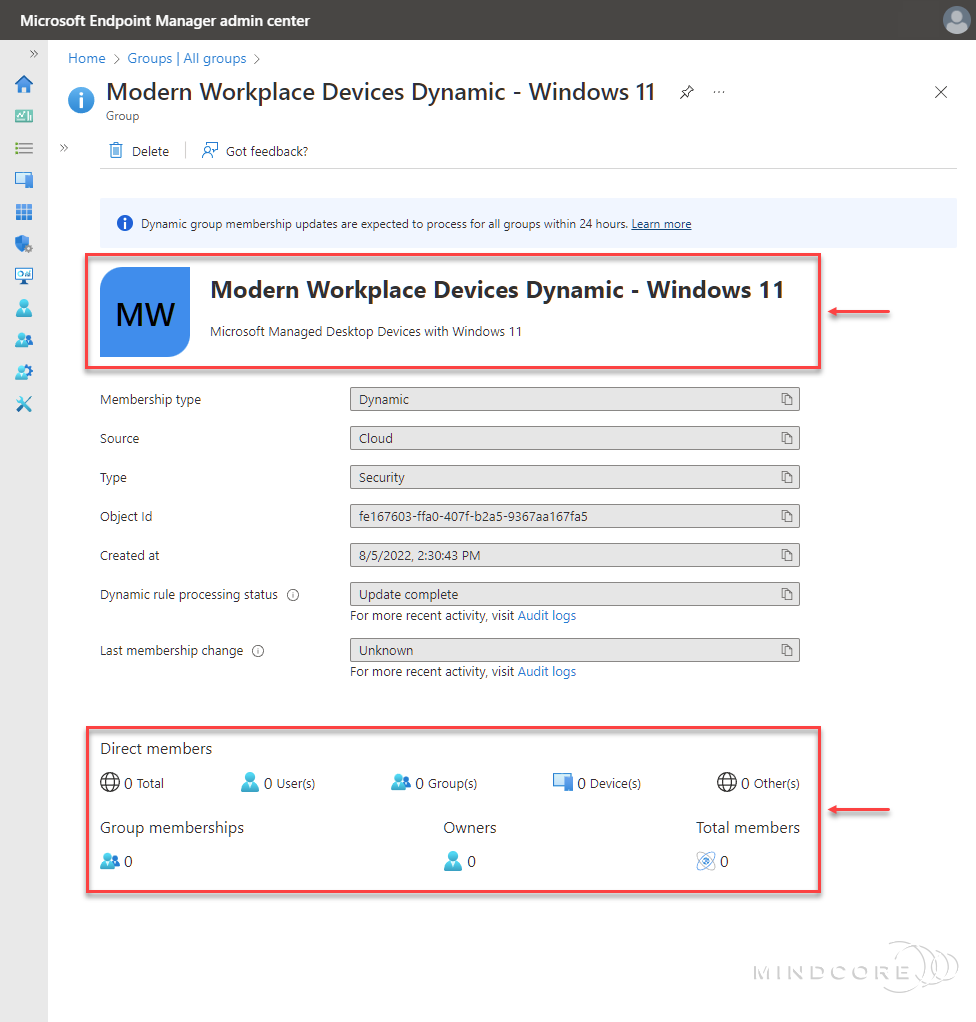
What exactly happened during the Windows Autopatch enrollment process? – Well, I can see that several Azure AD groups and service accounts were created in Azure AD by the Windows Autopatch service.
Just to highlight some of the more important ones.
Azure AD Groups:
- Modern Workplace Devices-Windows Autopatch-Test
- Modern Workplace Devices-Windows Autopatch-First
- Modern Workplace Devices-Windows Autopatch-Fast
- Modern Workplace Devices-Windows Autopatch-Broad
- Modern Workplace – Windows 11 Pre-Release Test Devices
- Modern Workplace Service Accounts
- Windows Autopatch Device Registration
Service Accounts:
- Modern Workplace Administrator Account (MSAdmin@xxx.com)
- Modern Workplace Interactive Administrator Account (MSAdminInt@xxx.com)
- Modern Workplace Test Account (MSTest@xxx.com)
Assigned Administrative Roles:
| Assigned Roles | Service Account |
| Helpdesk Administrator | • Modern Workplace Interactive Administrator Account |
| Intune Administrator | • Modern Workplace Administrator Account • Modern Workplace Interactive Administrator Account |
| Security Reader | • Modern Workplace Administrator Account |
| User Administrator | • Modern Workplace Administrator Account • Modern Workplace Interactive Administrator Account |
Note
Throughout this blog post, we will return to each highlighted Azure AD group and explain its purpose.
I can confirm that the Azure AD group Modern Workplace Service Accounts contains all Windows Autopatch service accounts and that the service excluded this group from my Conditional Access policies during the Windows Autopatch enrollment process.
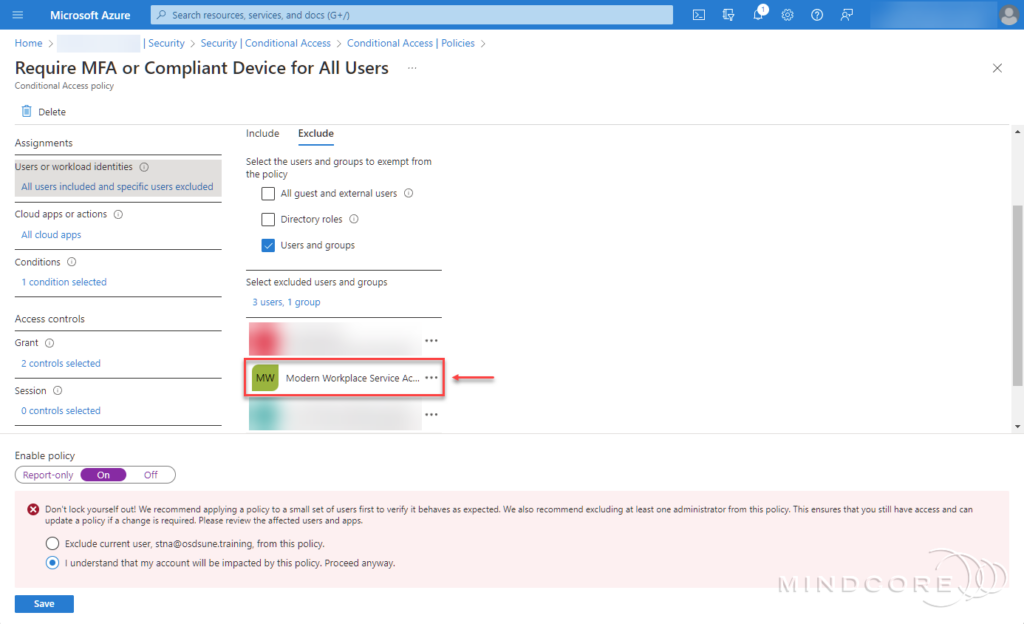
The enrollment process also created a new Conditional Access policy to restrict access to these accounts.
Deploying with Windows Autopatch
Now that we have completed the Windows Autopatch enrollment, we need to add and verify the admin contact information, which is essential for the Windows Autopatch Service Engineering Team to communicate with its customers. After that, we can finally begin registering our devices to the Windows Autopatch service so Microsoft can start to manage them on our behalf.
Add and Verify Admin Contact Information
Important
You might have already added these contacts in the Microsoft Endpoint Manager admin center during the Windows Autopatch enrollment process. If so, take a moment now to double-check that the contact information is accurate since the Windows Autopatch Service Engineering Team must be able to reach them if a severe incident occurs.
Go to https://endpoint.microsoft.com
In the left pane, click Tenant administration | Windows Autopatch | Admin contacts
From the Windows Autopatch Admin contacts blade, you can add, edit or remove the admin contact info.
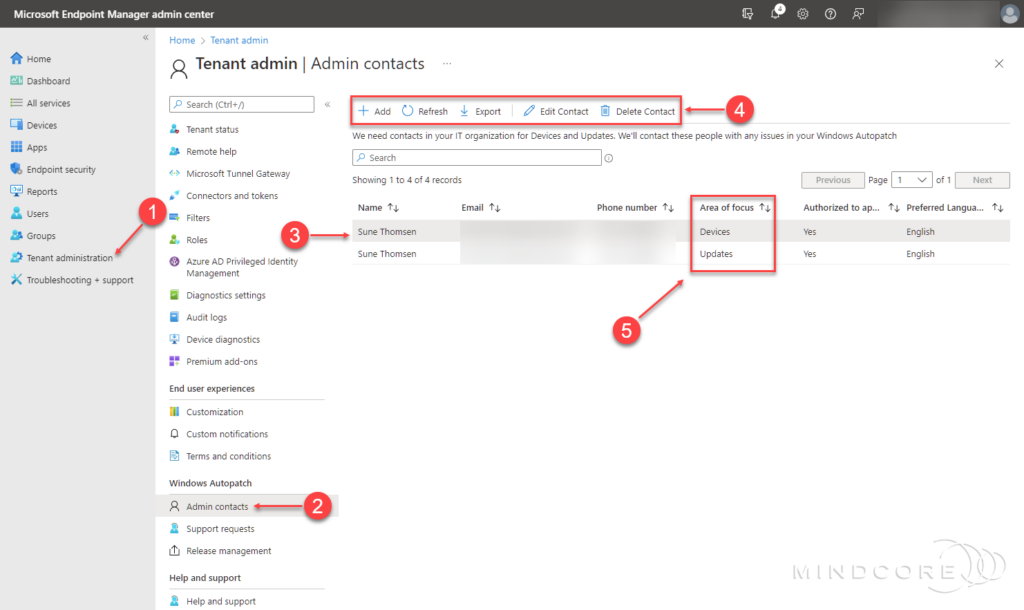
Your admin contacts will receive notifications about support request updates and new messages.
These areas include the following:
| Area of focus | Description |
| Devices | • Device Registration • Device Health |
| Updates | • Windows Quality Updates • Windows Feature Updates • Microsoft 365 Apps for Enterprise Updates • Microsoft Edge Updates • Microsoft Teams Updates |
Register Devices into the Windows Autopatch Service
Before Microsoft can manage devices in Windows Autopatch, we must have devices (either physical or virtual) registered with the service. You might recall that earlier in this post, I highlighted an Azure AD group called Windows Autopatch Device Registration, this group was created during the Windows Autopatch enrollment process, and its purpose is to register devices to the service.
We choose which devices to manage with Windows Autopatch by either adding them as direct membership or nesting other Azure AD dynamic/assigned groups into the Windows Autopatch Device Registration Azure AD group. Windows Autopatch automatically runs its discovery function every hour to discover new devices added to this group. Once the discovery function discovers new devices, Windows Autopatch attempts to register these devices.
Important
The Windows Autopatch Device Registration Azure AD group only supports one level of Azure AD nested groups.
Built-in Roles Required for Device Registration
We can use one of the following built-in roles to register devices in Windows Autopatch.
- Global Administrator
- Intune Administrator
- Modern Workplace Intune Admin
Note
The Modern Workplace Intune Admin role is a custom role in the Microsoft Endpoint Manager admin center created during the Windows Autopatch enrollment process.
To register physical or virtual devices into Windows Autopatch:
Go to https://endpoint.microsoft.com
In the left pane, click Devices | Windows Autopatch | Devices
Select the Windows Autopatch Device Registration hyperlink.
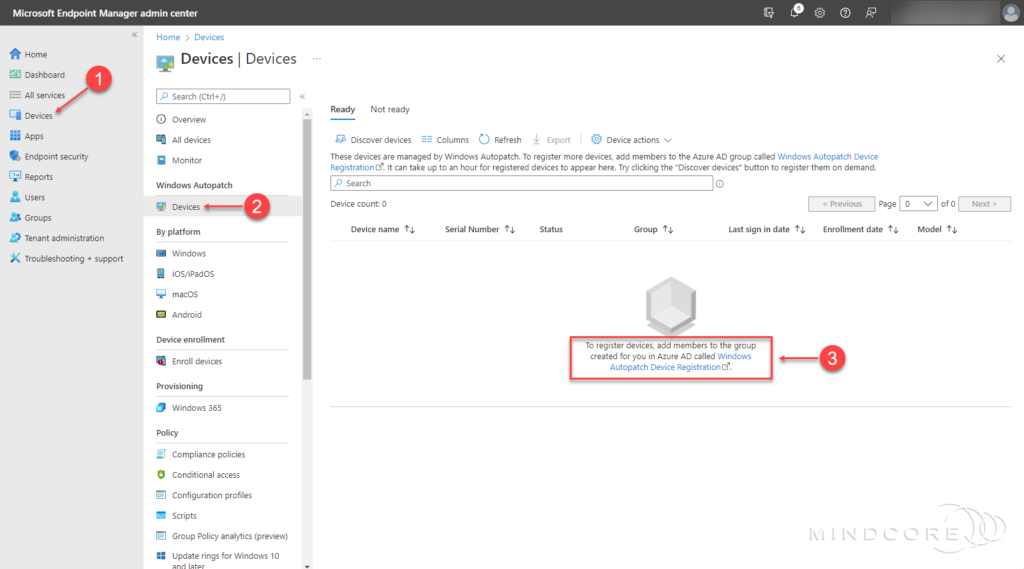
This opens the Windows Autopatch Device Registration Azure AD group blade in a new browser tab.
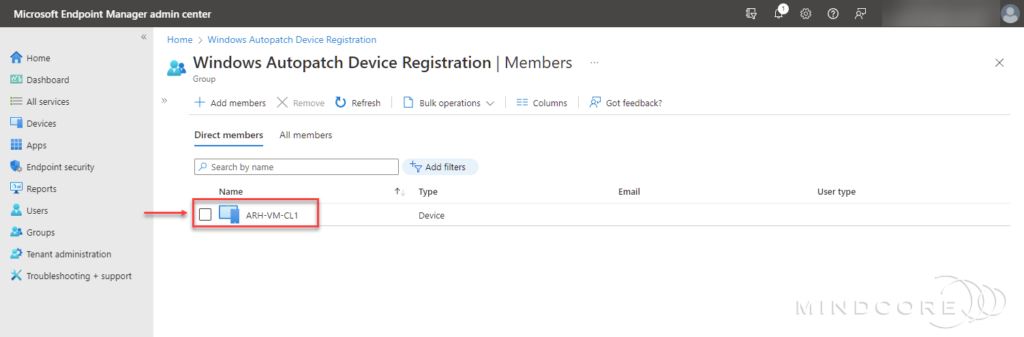
Add devices as direct membership or other Azure AD dynamic/assigned groups as nested groups in the Windows Autopatch Device Registration group. – I chose an existing Co-managed device with all workloads managed by Microsoft Intune.
Note
The Windows Autopatch Device Registration hyperlink is in the center of the Ready tab page when no devices are registered with the Windows Autopatch service. Once you have one or more devices registered with the Windows Autopatch service, the Windows Autopatch Device registration hyperlink is at the top of both the Ready and Not ready tabs.
Once devices or Azure AD groups containing devices are added to the Windows Autopatch Device Registration group, the Windows Autopatch service will discover these devices and run several prerequisite checks to try registering them with its service.
Tip
You can also use the Discover Devices button in either the Ready or Not ready tab to discover devices from the Windows Autopatch Device Registration Azure AD group on demand.
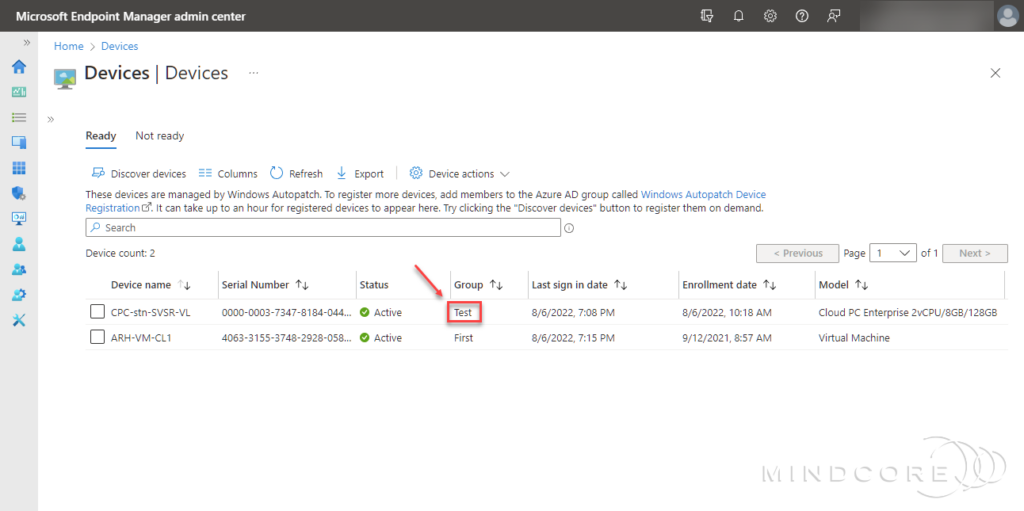
After a few minutes, I could see my Co-managed device appearing on the Windows Autopatch Devices blade.
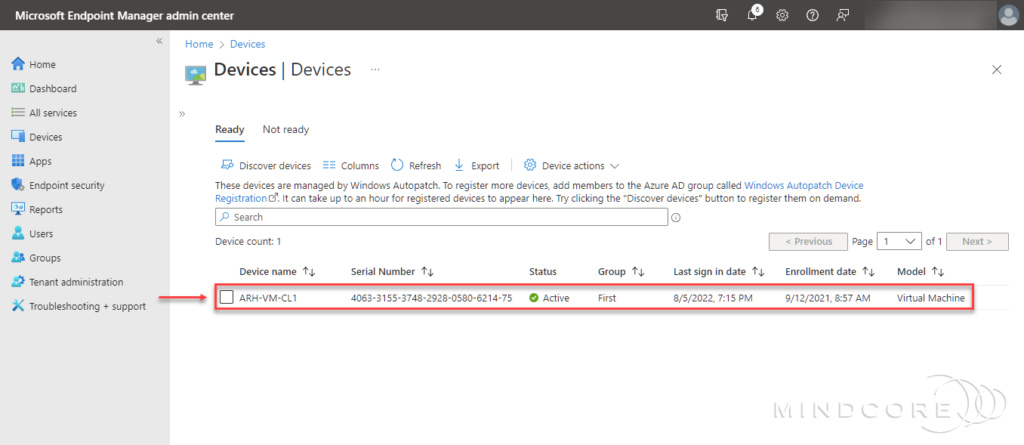
The Windows Autopatch Devices blade has two tabs, where the purpose of the Not ready tab is to help IT pros detect and troubleshoot device readiness.
| Tab | Purpose |
| Ready | The purpose of the Ready tab is to show devices that were successfully registered to the Windows Autopatch service. |
| Not ready | The purpose of the Not ready tab is to help you identify and remediate devices that don’t meet the prerequisite checks to register into the Windows Autopatch service. This tab only shows devices that didn’t successfully register into Windows Autopatch. |
Windows Autopatch and Windows 365 Enterprise Cloud PCs
The main reason that Windows Autopatch got my attention and curiosity in the first place was because of the Windows 365 Enterprise support (Windows 365 for Business is not supported). This Windows 365 Enterprise support provides a seamless experience for admins and users and ensures that the Cloud PCs are always up to date. When IT pros decide to manage their Windows 365 Enterprise Cloud PCs with Windows Autopatch, the Windows 365 provisioning process calls the Windows Autopatch device registration APIs to register devices on behalf of the IT pros.
Note
All existing Windows 365 Enterprise Cloud PCs can be registered into Windows Autopatch by leveraging the same method as any other physical or virtual device.
To provision Windows 365 Enterprise Cloud PCs and register them into Windows Autopatch:
Go to https://endpoint.microsoft.com
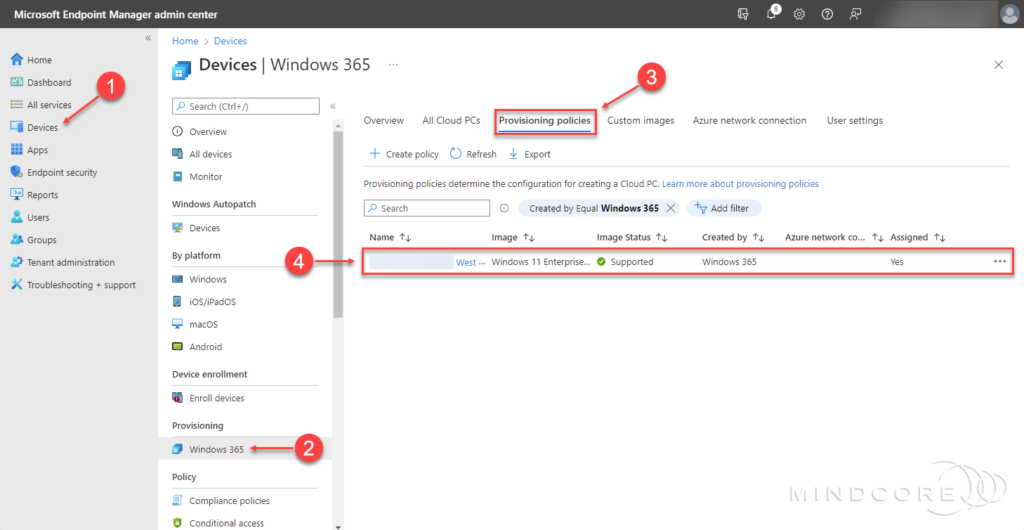
In the left pane, click Devices | Provisioning | Windows 365 and select the Provisioning policies tab.
Create a new policy or modify an existing provisioning policy. – I chose to modify an existing policy.
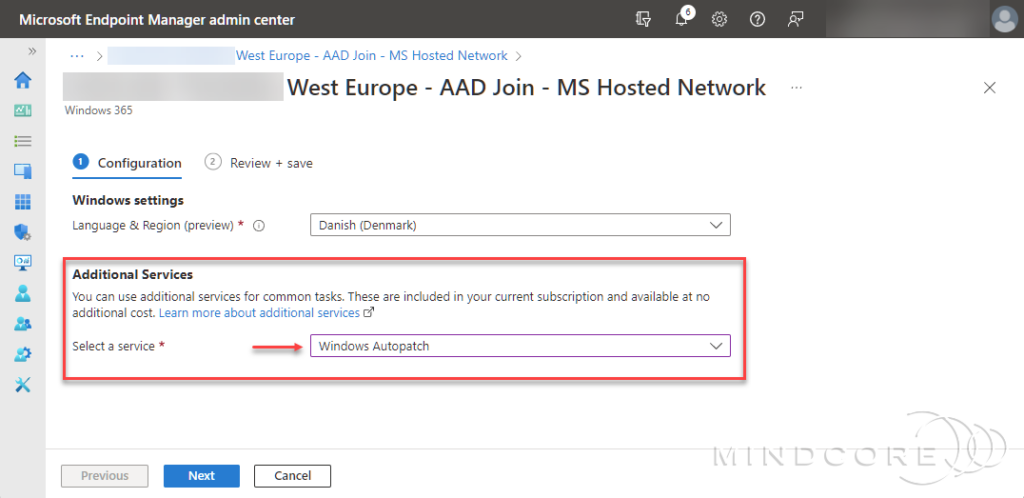
Under the Additional Services section, select Windows Autopatch. Then select Next and Update.
Important
If the “Windows Autopatch (preview) cannot manage your Cloud PCs until a Global Admin has finished setting it up.” message appears, you must complete the Windows Autopatch enrollment to continue.
The next time you provision a Windows 365 Enterprise Cloud PC, it will automatically be enrolled and managed by Windows Autopatch. Okay! Let’s test this by adding a Windows 365 Enterprise license to a user in my environment and see what happens. And as expected, after approx. 20-30 minutes, the new Windows 365 Enterprise Cloud PC appeared on the Windows Autopatch Devices blade. – Pretty cool, huh?

Update Management
In this section, we will dive deeper into the configuration made to Microsoft Endpoint Manager during the Windows Autopatch enrollment process. For example, the Windows 10/11 Update Rings, Device Configuration profiles, etc.
The Update Rings
Earlier in this post, I highlighted the four Azure AD groups that make up the update rings (Test, First, Fast and Broad). They were created during the Windows Autopatch enrollment process and are used to segment devices into update rings:
- Modern Workplace Devices-Windows Autopatch-Test
- Modern Workplace Devices-Windows Autopatch-First
- Modern Workplace Devices-Windows Autopatch-Fast
- Modern Workplace Devices-Windows Autopatch-Broad
Each update ring has a different purpose and is assigned a set of policies to control the rollout of updates in each update management area (Windows Quality/Feature Updates and partially Microsoft Edge).
Important
You can’t create additional update rings and must use the four update rings provided by Windows Autopatch.
During Windows Autopatch device registration, each device is assigned to an update ring (First, Fast, and Broad) so that we have the appropriate distribution across the estate. Unfortunately, there is no machine learning behind this distribution, and some devices may end up in the wrong update ring. But no worries, we can manually move devices around from the device view on the Windows Autopatch Devices blade. For example, we may need to move the device belonging to the CEO from the First to the Broad update ring.
| Ring | Default device count | Description |
| Test | Zero | Windows Autopatch doesn’t automatically add devices to this ring. You must manually add devices to the Test ring. The recommended number of devices in this ring, based upon your environment size, is as follows: • 0–500 devices: minimum one device • 500–5000 devices: minimum five devices • 5000+ devices: minimum 50 devices Devices in this group are intended for your IT Administrators and testers since changes are released here first. This release schedule provides your organization the opportunity to validate updates prior to reaching production users. |
| First | 1% | The First ring is the first group of production users to receive a change. This group is the first set of devices to send data to Windows Autopatch and are used to generate a health signal across all customers. For example, we can generate a statistically significant signal saying that critical errors are trending up in a specific release for all customers but can’t be confident that it’s doing so in your environment. Since Windows Autopatch doesn’t yet have sufficient data to inform a release decision, devices in this ring might experience outages if there are scenarios that weren’t covered during testing in the Test ring. |
| Fast | 9% | The Fast ring is the second group of production users to receive changes. The signals from the First ring are considered as a part of the release process to the Broad ring. The goal with this ring is to cross the 500-device threshold needed to generate statistically significant analysis at the tenant level. These extra devices allow Windows Autopatch to consider the effect of a release on the rest of your devices and evaluate if a targeted action for your tenant is needed. |
| Broad | 90% | The Broad ring is the last group of users to receive changes. Since it contains most of the devices enrolled in Windows Autopatch, it favors stability over speed in deployment. |
To change the group/update ring for a specific device, choose the device on the Windows Autopatch Devices blade, click Device action, and select Assign device group.
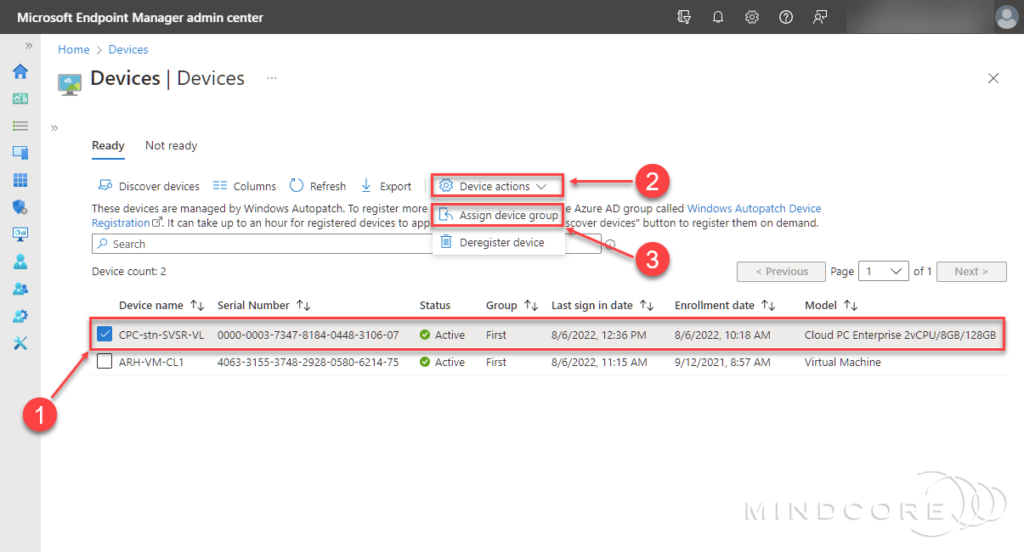
Choose which group/update ring to assign the device from the drop-down list and click Save.
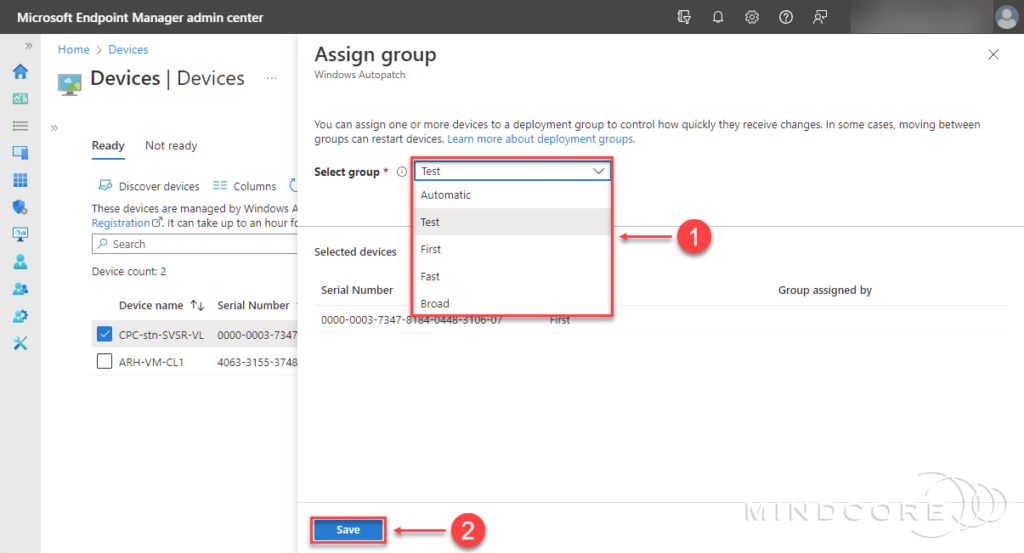
It may take a while. But ultimately, the device will be assigned to the chosen group/update ring.
Windows Quality and Feature Updates
Windows Quality Updates
Windows Autopatch aims to keep at least 95% of eligible devices on the latest Windows quality update 21 days after release. On the second Tuesday of each month, Windows Autopatch will gradually deploy the B release of the Windows quality update. But the services may determine that a quality update is critical to security and choose to expedite it at any time during the release period. If this happens, the goal of 95% of devices in 21 days no longer applies, and Windows Autopatch accelerates the release schedule to update the environment more quickly.
Windows Feature Updates
Windows Autopatch aims to keep at least 99% of eligible devices on a supported version of Windows to continue receiving Windows feature updates. When the service decides to move to a new version of Windows, the timeline below indicates the minimum time between each ring rollout.
Note
The final release schedule is communicated prior to the feature release and may vary a little from the timeline below to account for business weeks or other scheduling considerations.
The table below shows the deferral, deadline, and grace period for each group/update ring and update type.
| Update Type | Group | Feature Update | Timeline | Deferral | Deadline | Grace period |
| Windows Quality | Test First Fast Broad | N/A N/A N/A N/A | N/A N/A N/A N/A | 0 1 6 9 | 0 2 2 5 | 0 2 2 2 |
| Windows Feature | Test First Fast Broad | 21H2 21H2 21H2 21H2 | Release + 0 Release + 30 Release + 60 Release + 90 | 0 0 0 0 | 5 5 5 5 | 0 0 2 2 |
| Windows Expedited | All Devices | N/A | N/A | 0 | 1 | 1 |
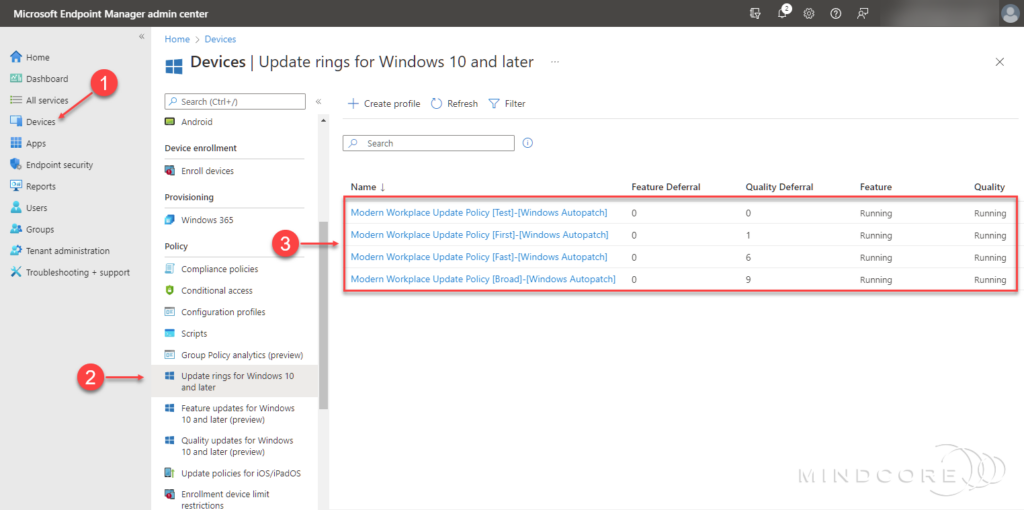
Let’s look at the Update rings for Windows 10 and later and Feature updates for Windows 10 and later (preview) policies created in Microsoft Endpoint Manager during the Windows Autopatch enrollment process.
Go to https://endpoint.microsoft.com
In the left pane, click Devices | Policy | Update rings for Windows 10 and later.
A profile has been created for each update ring (Test, First, Fast, and Broad), and each ring’s configuration matches the above table deferral, deadline, and grace period.

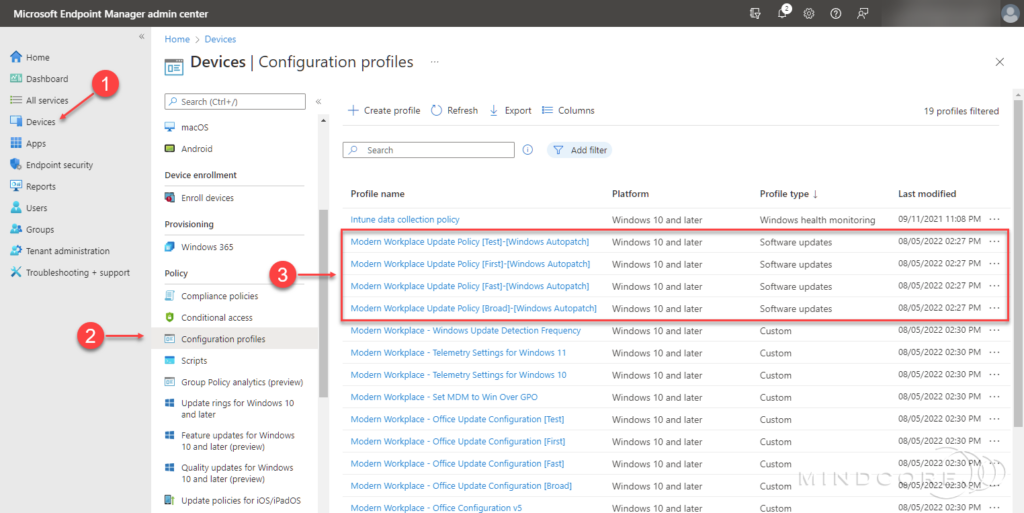
In the left pane, click Devices | Policy | Configuration profiles.
A device configuration profile has been created for each update ring (Test, First, Fast, and Broad), and each configuration profile matches the above table deferral, deadline, and grace period.
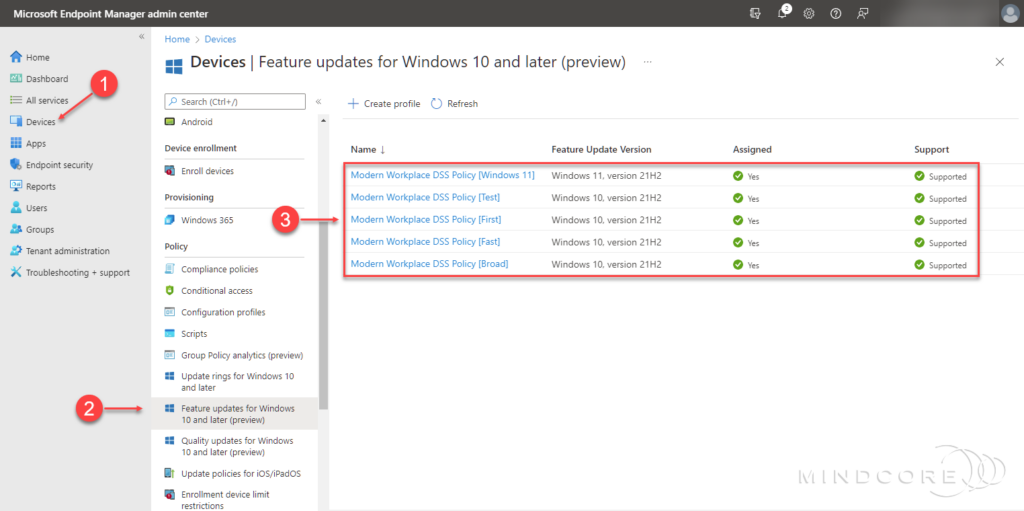
In the left pane, click Devices | Policy | Feature updates for Windows 10 and later (preview).
A profile has been created for each update ring (Test, First, Fast, and Broad) + one for Windows 11, and each ring’s configuration matches the above table feature update version.
The Modern Workplace DSS Policy [Windows 11] profile enables you to test Windows 11 before a broad rollout within your environment. When you add devices to the Modern Workplace – Windows 11 Pre-Release Test Devices Azure AD group, they’ll update to Windows 11.
Note
The Modern Workplace DSS Policy policies control the target version of Windows. The deferrals and deadlines for feature and quality updates are controlled by the Modern Workplace Update Policy policies from the Update rings for Windows 10 and later blade.
Important
The Modern Workplace DSS Policy [Windows 11] profile is intended for testing purposes only and shouldn’t be used to broadly rollout of Windows 11 within your environment.
Microsoft 365 Apps Updates
All devices registered for Windows Autopatch will receive updates from the Monthly Enterprise Channel. Updates from this channel are pulled directly from the Office Content Delivery Network (CDN) and released on the second Tuesday of each month. – These updates can include Feature, Security, and Quality updates.
Note
Windows Autopatch doesn’t use update rings to control the rollout of these updates.
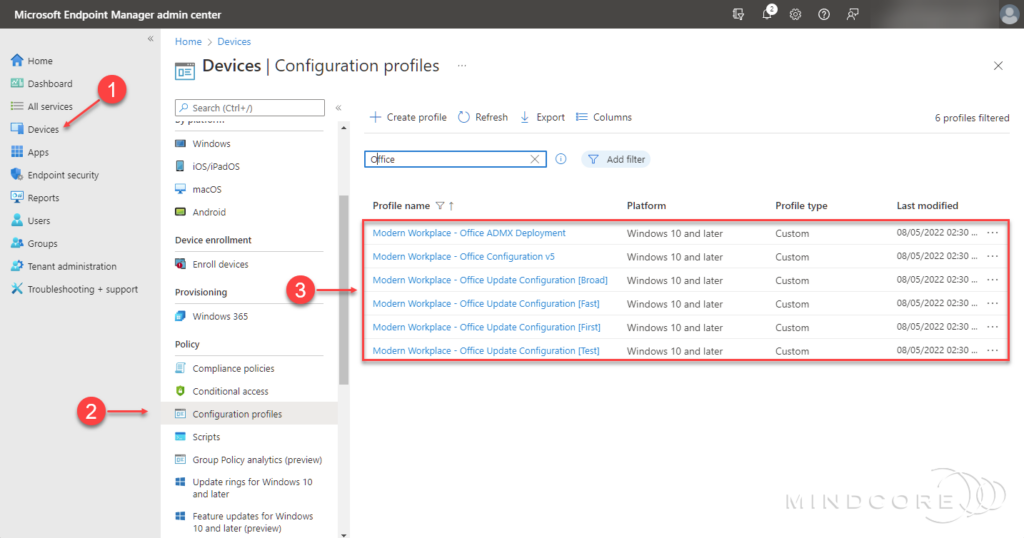
In the left pane, click Devices | Policy | Configuration profiles.
Several device configuration profiles have been created for the Microsoft 365 Apps configuration.
Microsoft Edge Updates
Windows Autopatch uses the Stable Channel of Microsoft Edge, and updates are rolled out progressively by the Microsoft Edge product group to ensure the best experience for customers.
Devices in the Test update ring receive feature updates from the Beta Channel. This channel is fully supported and automatically updated with new features approximately every four weeks.
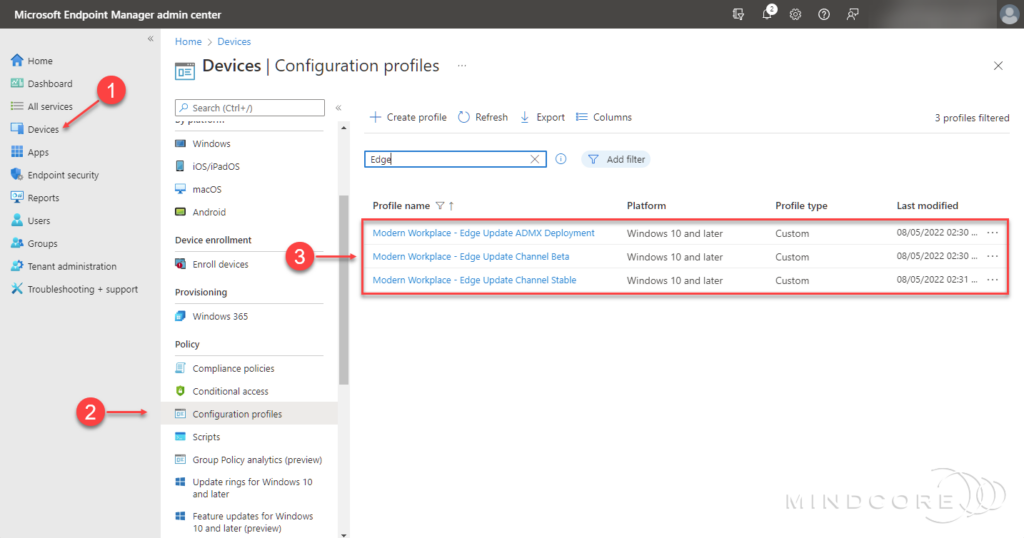
In the left pane, click Devices | Policy | Configuration profiles.
Several device configuration profiles have been created for the Microsoft Edge configuration.
Microsoft Teams Updates
Windows Autopatch uses the standard automatic update channel for Microsoft Teams. Updates for the Teams desktop client are released monthly for all users and twice a month for Technology Adoption Program (TAP) members.
Note
Windows Autopatch doesn’t use update rings to control the rollout of these updates.
Monitor the Update Deployment and Device Health
After enrolling your tenant to Windows Autopatch and the service starts to manage and deploy updates in your environment, the IT pros would probably want some visibility into Windows update status, device health, and other insights. These insights are provided through reports in the Microsoft Endpoint Manager admin center. – Let’s check it out!
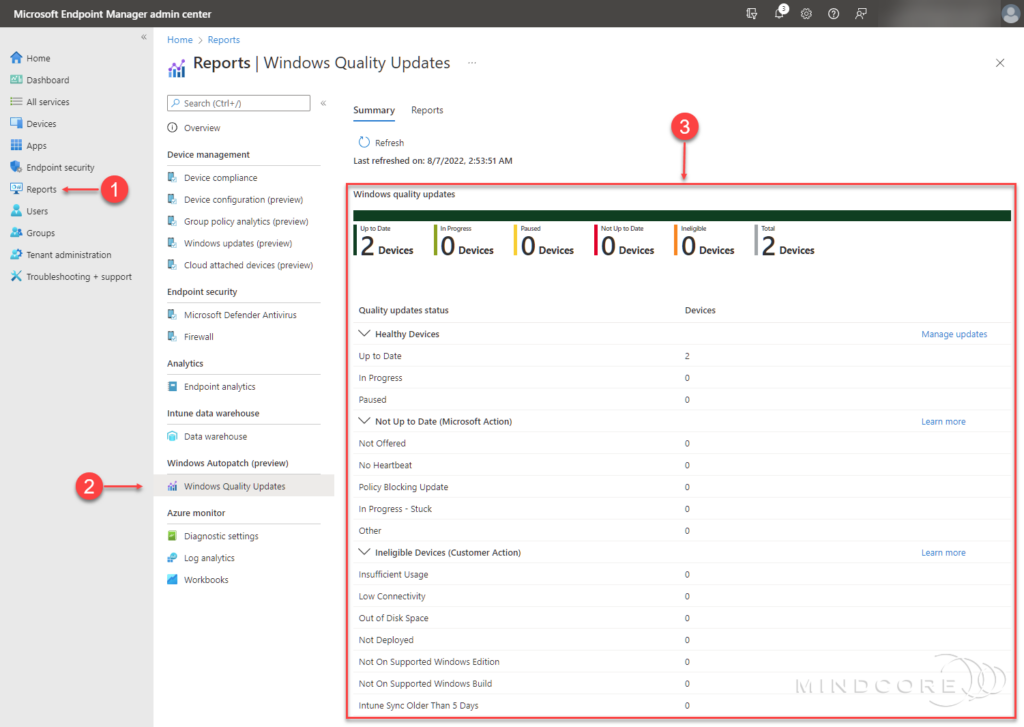
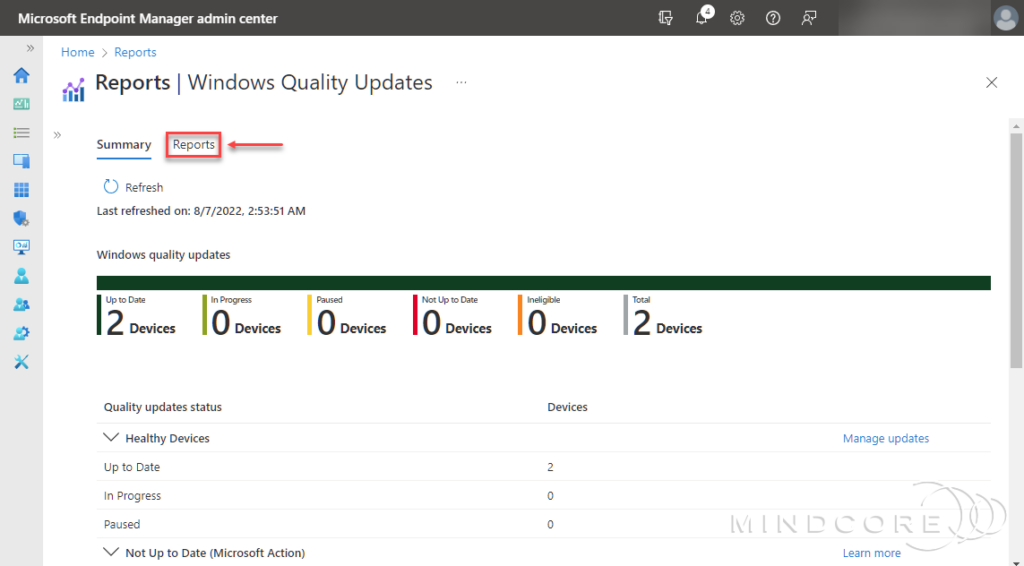
In the left pane, click Reports | Windows Autopatch (preview) | Windows Quality Updates.
From the Windows Quality Updates blade, you will see a summary of Windows quality updates and device health across all devices registered to Windows Autopatch.
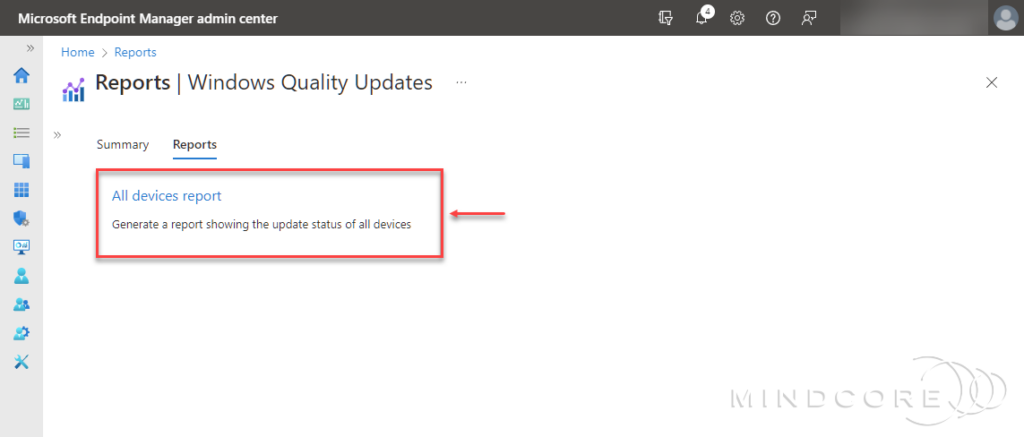
Still on the Windows Quality Updates blade, click Reports.
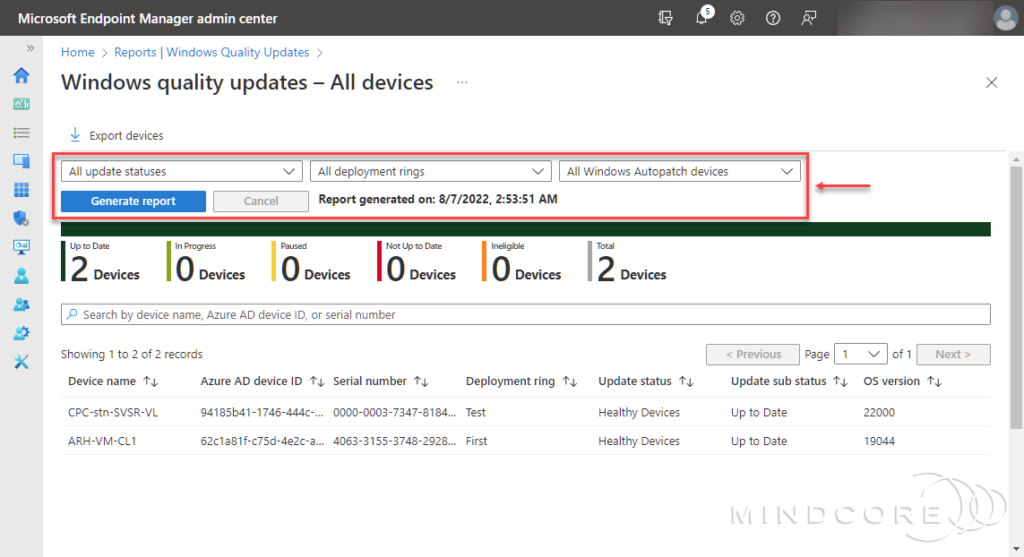
Select the All devices report.
A report is generated, which can take a while. Once the report is successfully generated, you can use the filters (All update statuses, All deployment rings, and Windows Autopatch devices) to refine it further. If you use the filter, don’t forget to click Generate report to generate a new report.
Summary and Conclusion
In this blog post, you learned how to enroll your tenant into Windows Autopatch and register devices to the service. I also showed you how to configure the Windows 365 Enterprise provisioning policy to register Cloud PCs directly to the Windows Autopatch service during the provisioning process and where to monitor update deployments and device health afterward.
Prior to enrolling my tenant into Windows Autopatch, I created a few Conditional Access policies to see how Windows Autopatch would cope with that. – But besides that, it was a clean tenant without any Device Configuration profiles or Windows update policies.
During my exploration of Windows Autopatch, we found out that during the Windows Autopatch enrollment process, the service had created the following:
- Eighteen Azure AD groups.
- Three Windows Autopatch Service Accounts (two of which were added to multiple administrator roles).
- Four Update rings for Windows 10 and later policies.
- Five Feature updates for Windows 10 and later (preview) policies.
- Eighteen Device Configuration profiles.
- One Custom Endpoint Manager role.
- One Conditional Access policy.
I think that Windows Autopatch has some fantastic functionality built into its service. For example, it was definitely cool to see that it could exclude the services accounts from my existing Conditional Access policies during the Windows Autopatch enrollment process. I also think the reporting and support for Windows 365 Enterprise Cloud PCs are pretty cool!
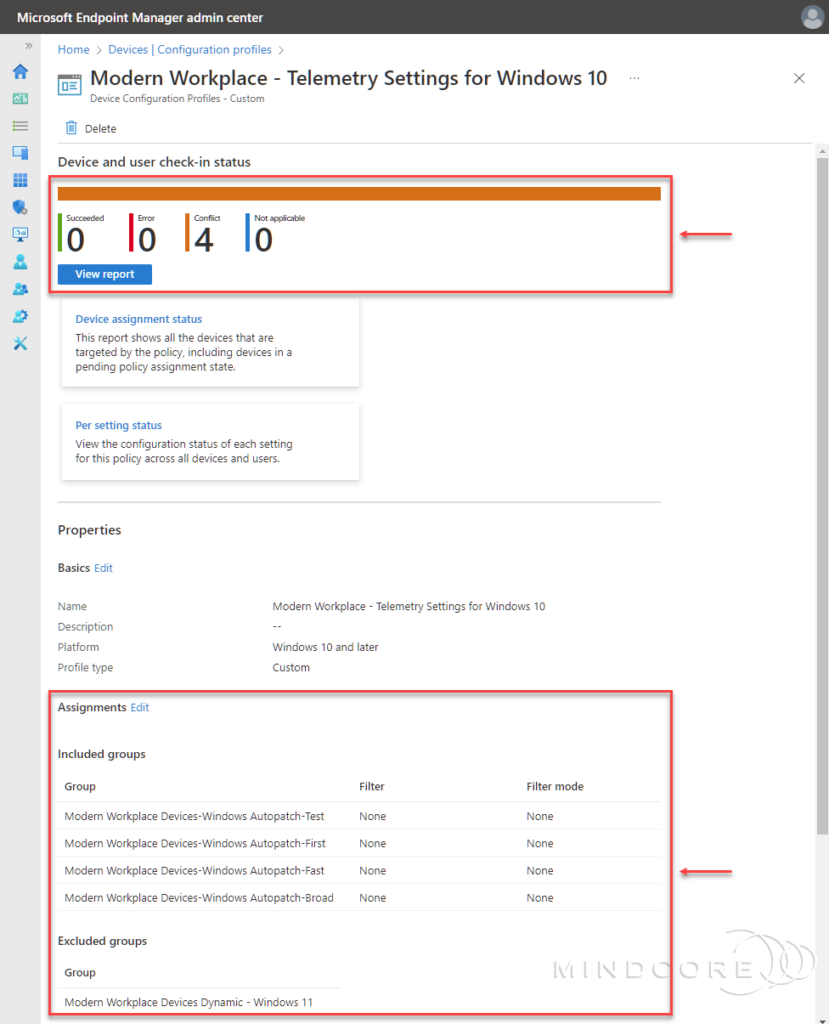
However, there is room for improvement, in my opinion. For example, I did experience that the telemetry profiles conflict with each other, probably because the dynamic Azure AD groups used as an exclusion in the assignments for both policies are empty.
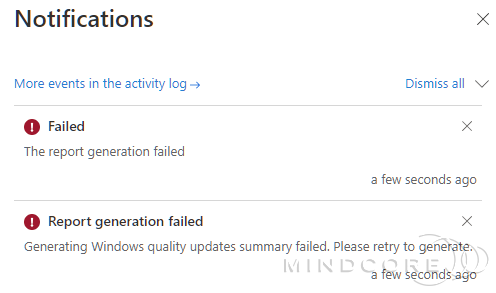
I also noticed errors repeatedly showing when accessing the reports for Windows Autopatch.
And lastly, why release a product with the Device Configuration profiles based on the Custom OMA-URI settings? I am not saying it is wrong, but why not use the “new” settings catalog template wherever possible?
So, who is it for? – I think Windows Autopatch could be an excellent fit for some small and medium-sized business (SMB) customers. For larger or more complex organizations, it may not be the right solution here in its early stages, but as the product evolves and enhances over time, who knows?
I definitely think it’s worth looking into and perhaps start exploring its functionality by yourself and come to your own conclusions on this topic. – That’s it, folks. Happy testing! 🤓
If you have any questions regarding this topic, please feel free to reach out to us.