Part 1 – Using a hybrid connection in Azure App Service
Introduction
In this new series we will cover how to safely and securely execute code remotely on physical devices, from the cloud.! Even though most organizations are talking about cloud adoption and transformation, the reality is, that most organizations at least for now are often still relying on physical machines, this could be an on-premises domain controller or a file servers etc.
There is no shortage of services in the Microsoft cloud where you can execute code or run scripts on a schedule and all these services are easily connected securely to each other. But the need for executing a script, processing a report, or maintaining data etc., which needs to be executed from the cloud, this can often prove to be a lot more challenging and typically requires more moving parts or specific domain knowledge to achieve.
The purpose of this series is to provide some possibilities to make this happen, and luckily, we do have some options. Some work better than others and are easier to setup, but they all more or less achieve the same goal. Which is: have a cloud service remote execute a piece of code on a physical device.
In this first part, we will cover how to execute a script on a physical VM using a hybrid connection via Azure App Service.
Overview of the series
- Part 1 – using a hybrid connection in Azure App Service.
- Part 2 – execute an automation runbook on a hybrid worker.
- Part 3 – utilizing a selfhosted agent in Azure DevOps pipeline.
- Part 4 – using a Power automate desktop flow
Requirements
- Administrative privileges to your local machine.
- A Function app (with PowerShell core runtime) deployed in the above App service.
- A provisioned Azure App Service in your subscription, with a production SKU, none of the basic SKU’s allows you to add hybrid connections.

The scenario
There can be many scenarios where you might need to execute a piece of code on a physical machine:
- An on-premises file server
- A user owned laptop
- A physical domain controller hosting a local Active Directory.
- A jump host located in close proximity of an office
- And more…
In this imaginary scenario we will utilize an Azure function to query a local Developer server for the current status of running services. Obviously a very basic routine but intentionally simple for the sake of the demo.
Architecture
Hybrid Connections utilizes an Azure relay agent to be deployed, this service sits in the middle of Azure App service and the physical machine where it has access to both endpoints. The relay agent, Hybrid Connection Manager (HCM), calls out to Azure Relay over port 443.
When the Azure app service and the on-premises endpoint is joined through the connection, the Azure app can communicate with the endpoint using TLS 1.2 and a Shared access signature key for authentication and authorization.

When your app makes a DNS request that matches a configured Hybrid Connection endpoint, the outbound TCP traffic will be redirected through the Hybrid Connection.
Hybrid connection
Create the hybrid connection in Azure
First order of business is to create the resources needed in Azure, you cannot simply install the agent on the server and have it automatically connect to Azure. We need to setup the endpoint, which eventually will be hosted by the Azure relay service.
In the requirements, it was stated that we need a fully provisioned Azure app service and a Function app installed in the service. Also mentioned in the requirements, its important to select the right SKU, otherwise it will not be possible to add a hybrid connection.
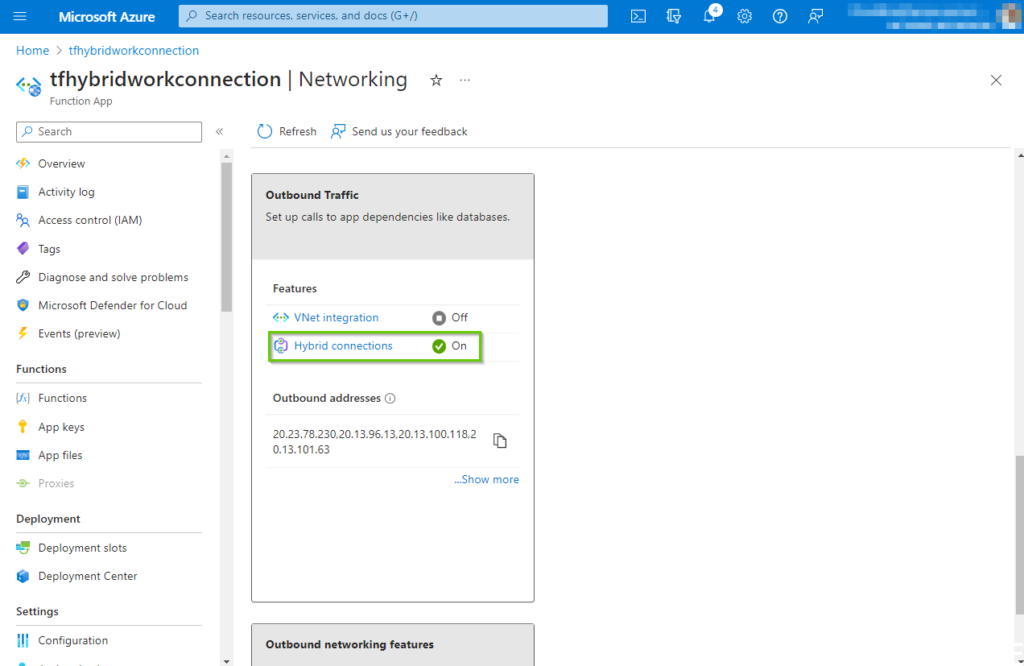
Now navigate to the Function app in the Azure portal and click “Networking” -> “Hybrid Connections”.
On the hybrid connections pane click on the “Download connection manager” link, this will kick of the download process for the installation package hybrid connection manager agent. The downloaded file should be transferred to the machine where the hybrid connection is supposed to live.
We will get back to the actual installation of the agent, later in this article.

Next, click on the “Add hybrid connection” which will navigate to the next step in the process.

On the the “Add hybrid connection” pane click the “Create new hybrid connection” button.

This will bring up the side pane where we need to fill in some important information, it’s important to pay attention and fill in the right information, since Azure will create all the Azure resources automatically after this step.
- Hybrid connection name: The display name of the connection, name it something meaningful like the name of the machine we will be connecting to.
- Endpoint host: This must be the accurate full hostname of the physical machine (not the NETBIOS name, but the full name)
- Endpoint port: It could be 5986, but it doesn’t really matter since we will later on create a firewall rule and a certificate to protect that port. Just make sure you remember the port number for later, where we will create a https listener on the local machine.
- Service bus namespace: If you don’t have an existing Servicebus namespace, choose a relevant name for a new one.
- Name: The name should be meaningful in its usage.
- Location: Choose the same location as the app service.
Next click on “Ok”, which will begin the creation process.

After a few minutes, our brand-new hybrid connection will hopefully be provisioned. By clicking on the newly created connection will bring up the properties pane.
Important: Copy the “Gateway connection string” and save it in notepad or something similar, we will need this later in this article.

Navigating to the Azure relay service, reveals part of our work so far. Here we will, when everything is properly setup, be able to track the throughput and status of our connection.

Prepare the target machine
In this section we will be dealing with our local machine. We need to complete a few steps to successfully connect to the hybrid connection endpoint we created in the previous section.
The steps are as follows:
- Create a firewall port opening for the endpoint port.
- Create and install a certificate on the machine.
- Create a https listener using the port and certificate.
- Install the Hybrid Connection Manager software.
- Configure the Hybrid Connection Manager.
- Restart the service to enable the software.
The following PowerShell code will create a port opening in the local Windows firewall. In a real-world production scenario, this process will most likely be a different process, especially if using a different type of firewall and most likely you don’t want to allow “Any” inbound traffic on the port either. You might also want a properly signed certificate. But for the sake of this article, we will simply focus on making it work.
| # Enable PowerShell remoting. Enable-PSRemoting -Force # Create firewall rule for WinRM. The default HTTPS port is 5986. New-NetFirewallRule -Name “WinRM HTTPS” ` -DisplayName “WinRM HTTPS” ` -Enabled True ` -Profile “Any” ` -Action “Allow” ` -Direction “Inbound” ` -LocalPort 5986 ` -Protocol “TCP” # Create new self-signed-certificate to be used by WinRM. $COMPUTERNAME = “DeveloperMachine-Mindcore” $Thumbprint = (New-SelfSignedCertificate -DnsName $COMPUTERNAME -CertStoreLocation Cert:LocalMachineMy).Thumbprint # Create WinRM HTTPS listener. $Cmd = “winrm create winrm/config/Listener?Address=*+Transport=HTTPS @{Hostname=””$COMPUTERNAME “”; CertificateThumbprint=””$Thumbprint””}” cmd.exe /C $Cmd |
Executing the above script should produce the following output, remember to elevate your PowerShell console with administrative privileges.
The script covers the first 3 steps:
- Creating the firewall rule
- Create and install the server certificate
- Create the https listener

Next, we will complete step 4, which is installing Hybrid Connection Manager software on the target machine. This is a straightforward process, and unless you have restrictions in your policy settings which is not allowing you to install software on the machine, it will be a simple process.
Execute the previously download Hybrid Connection Manager software, accept the terms and click “Install”.

After a short while the installation is complete, and you can click “Finish” to close the installer. That’s it!

Setting up the connection on the target machine
Now we need to configure the software we installed in the previous section. You have two options to choose from, the interactive experience by clicking the “Add …” button or “Enter manually”. I find the “Enter manually” is actually the easiest and less prone to errors, so we will choose this option.

Remember back in the section where we created the hybrid connection in the Azure portal, we copied the gateway connection string. This is where we will insert this string and click on the “Add” button.

This will not prompt you for authentication, we have already defined everything we need, we simply need to tie it all together with the connection string. When done, you will find that the “Status” will be Not Connected, and it will stay that way, we are typically used to connections towards Azure might take a few minutes to light up. But in this situation, it will not change until we do something about it.

It’s luckily quite easy to fix. We just need to restart the local service behind the Azure Hybrid Connection manager. Launch the services panel, it can also be done via PowerShell if you prefer that approach and restart the service like shown in the picture below.

Almost immediately after the connection changed to Connected. You could argue this is poor design (which it is of course!) but in any case, this is how you control the connection and you can always restart the service this way if the connection fails maybe after an unscheduled reboot.

If we navigate to the Azure portal again and find the hybrid connection pane. We can now see that we have an active listener on the connection. This is of course the listener we created via the PowerShell script on the local machine.

In the Azure app service, we can also see the status changed to Connected for the hybrid connection we created in the beginning of this article. This means we have completed all the configuration and we have successfully connected the local service with the hybrid connection endpoint in Azure.

Next, we obviously want to start testing this connection. And finally witness that we can execute some code on the local machine, from Azure.
Testing the hybrid connection
By now, if we did everything correct in the previous sections, we should have a working connection in our Function app. Before we start executing any code, we typically would like to verify that the connection is live, and we can ping our remote endpoint. A simple to do that is to enter the console pane in the function app, and just ping the local machine.
My local machine’s name is: DeveloperMachine-Mindcore, and I chose to use 5986 as the port. So, if you type the following command in the console (replace the machine name and port to match your environment):
tcpping DeveloperMachine-Mindcore:5986
You should hopefully get the same result as in the below screenshot. Which is a successful ping response from our local target machine.

If you can ping the machine, it’s safe to move onto the next step, which is to write a small piece of code. It does require us to do a bit more work than we normally do when executing a script, we need to remember we establishing a session on the remote machine, and define what we want to execute and eventually get returned back to us.
The script we will write is very simple, we start by defining a set of credentials, this should be any local account which has administrative access to the machine. We enter the name of the machine and in the $script variable we write the script block of code we want to execute on the target machine, in the scenario section of this article we stated the following:
“… in this imaginary scenario we will utilize an Azure function to query a local Developer server for the current status of running services.”
We achieve this by providing the command “Get-Service”, and this is our script block which we will send to the target machine. We will create a new PowerShell session at execute the script block via the Invoke-Command cmdlet.
| using namespace System.Net # Input bindings are passed in via param block. param($Request, $TriggerMetadata) # Write to the Azure Functions log stream. Write-Host “PowerShell HTTP trigger function processed a request.” # Create variables $Credential = New-Object -TypeName System.Management.Automation.PSCredential -ArgumentList “[username]” , (ConvertTo-SecureString -String “[password]” -AsPlainText -Force) $HybridEndpoint = “DeveloperMachine-Mindcore“ # Script block $Script = { Get-Service } Write-Output “Running command via Invoke-Command” $session = New-PSSession -ComputerName $HybridEndpoint -Credential $Credential -Port 5986 -UseSSL -SessionOption (New-PSSessionOption -SkipCACheck) Invoke-Command -Session $session ` -ScriptBlock $Script ` -ArgumentList “*” ` Remove-PSSession -Session $session Write-Output “Finished executing Invoke-Command” |
Below is how the script should like in the code editor in the portal.

At last, the fruit of our labor. When we execute the script, and if we did everything right we should see a list of current services running on the local machine.

Summary
There is a lot of work involved in getting this working and we introduced some fairly complex concepts for some people. The scenario is intentionally kept very simple to not over complicate the article, but hopefully you can see how this could easily be scaled with a lot more advanced code. An alternative could be to call a local script on the machine instead, if you have a massive framework you need to execute.
This article was the first part of a series on how to execute code remotely on physical devices, from the cloud. We hope you found this article useful.
Happy testing! 😊