In this small blog post, I will try to give you some insights on what Advanced hunting´s custom detection rules is – and how you can use it!
Introduction
Microsoft Defender XDR is a powerful security platform that uses AI, machine learning, and behavioral analytics to detect and respond to threats in real time. One of its most valuable tools is Advanced Hunting—a query-based search engine that lets you dig into raw security data across your environment using Kusto Query Language (KQL).
But it doesn’t stop there. Defender also allows you to create custom detection rules, turning those advanced hunting queries into automated alerts and actions. This means you can define exactly what suspicious behavior or system activity you want to be alerted about—and let Defender handle the detection and response.
Why is this important? Because every organization has unique security requirements. With custom detections, you can catch threats that might otherwise slip through, such as forbidden software installations, use of hacking tools, or unexpected local account creation.
Whether you’re a security analyst, SOC team member, or IT admin, learning how to build and use custom detection rules in Defender XDR helps you take a more proactive and tailored approach to threat detection.
Why Use Custom Detection Rules?
By integrating with Advanced Hunting, custom detections allow you to scan system and network events at scheduled intervals. When a match is found, Microsoft Defender for Endpoint Plan 2 can automatically generate alerts and initiate response actions.
Key benefits:
✅ Alerts based on tailored advanced hunting queries
✅ Automated responses for detected threats
✅ Proactive detection—identify suspicious behavior before it becomes a real threat
✅ Streamlined investigations and faster response times
Requirements
- Permissions for managing custom detections
- Security settings (manage) – Microsoft Defender XDR permission
- Security Administrator – Microsoft Entra role
- Security Operator – Microsoft Entra role
- Defender for Endpoint Plan 2
Data sources
The following applications and services currently contribute data to the Advanced Hunting platform in Microsoft Defender XDR (security.microsoft.com):
- Microsoft Defender for Endpoint (MDE)
- Microsoft Defender for Identity (MDI)
- Microsoft Defender for Cloud Apps (MDA)
- Microsoft Defender for Office (MDO)
- Azure AD Identity Protection (AADIP)
- Azure AD User & Sign-in Information (AAD)
These data sources provide valuable insights for threat detection, investigation, and response across your environment.
Usecases
Every environment could be nice when you on top add custom detections tailored to specific applications, behaviors, and security needs. Microsoft Defender does not automatically alert on every potentially malicious activity, but it provides extensive data that can be used to create custom detection rules.
Examples of Custom Detection Rules to identity events could be something like:
- Installation of forbidden software
- Remote tools (e.g., TeamViewer) installed and making outbound connections
- Creation of a local account
- Download or installation of hacking tools (e.g., Mimikatz)
- Detection of an alert with a specific title or severity
- List all devices where ASR is blocking a file
- Blocked network connections via Web content Filtering
- Get all devices with EOL versions of Windows
By leveraging custom detection rules, security teams can enhance threat visibility and automate responses based on their unique security requirements.
Create a custom detection rule
In the Microsoft Defender portal, navigate to Advanced hunting, then select an existing query or create a new one. If creating a new query, run it to identify errors and analyze potential results.
Needed information to get insights
To create a custom detection rule, your query must include the following columns:
- Timestamp – Defines the timestamp for generated alerts.
- Unique Event Identifier – A column or combination of columns that uniquely identifies the event in Defender XDR tables:
- Microsoft Defender for Endpoint tables: The query must include Timestamp, DeviceId, and ReportId in the same event.
- Alert tables*: The query must include Timestamp in the event.
- Observation tables*: The query must include Timestamp and ObservationId in the same event.
- All other tables: The query must include Timestamp and ReportId in the same event.
- Impacted Asset Identifier – At least one of the following columns must be included to strongly identify the affected asset:
- Device-related identifiers:
- DeviceId
- DeviceName
- RemoteDeviceName
- Email-related identifiers:
- RecipientEmailAddress
- SenderFromAddress (envelope sender or Return-Path address)
- SenderMailFromAddress (sender address displayed by the email client)
- Account-related identifiers:
- RecipientObjectId
- AccountObjectId
- AccountSid
- AccountUpn
- InitiatingProcessAccountSid
- InitiatingProcessAccountUpn
- InitiatingProcessAccountObjectId
- Device-related identifiers:
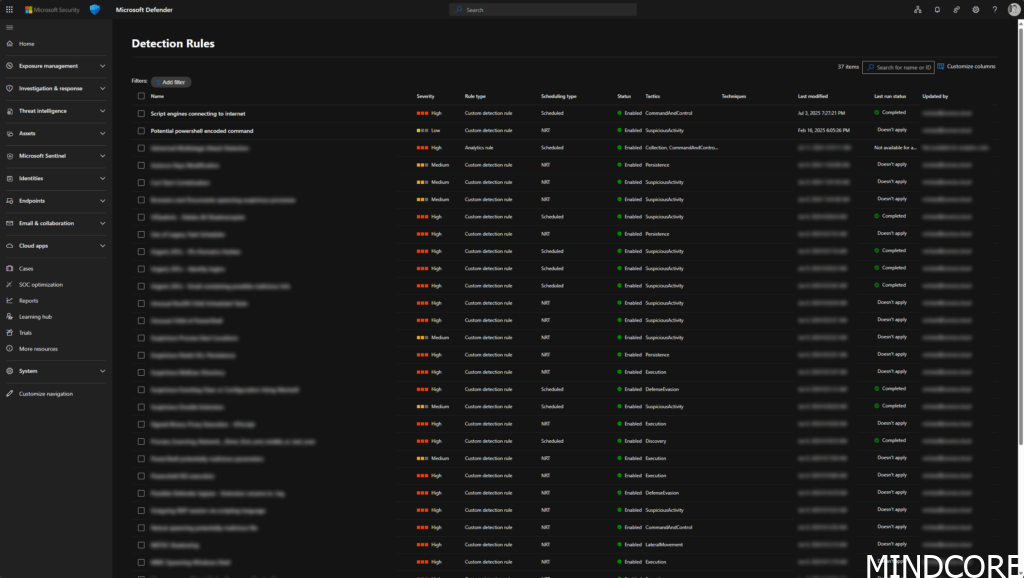
See your current Custom Detection rules
Lets drive into the Defender Portal and lets see what you have (default no rules here).
Go to Home – Microsoft Defender > Investigate & Response > Hunting > Custom detection rules to see the rules – here can be a lot like in this sample:
Now lets create a Custom Detection rule
First, we need to provide the following details – the KQL itself we need to detect data/events on:
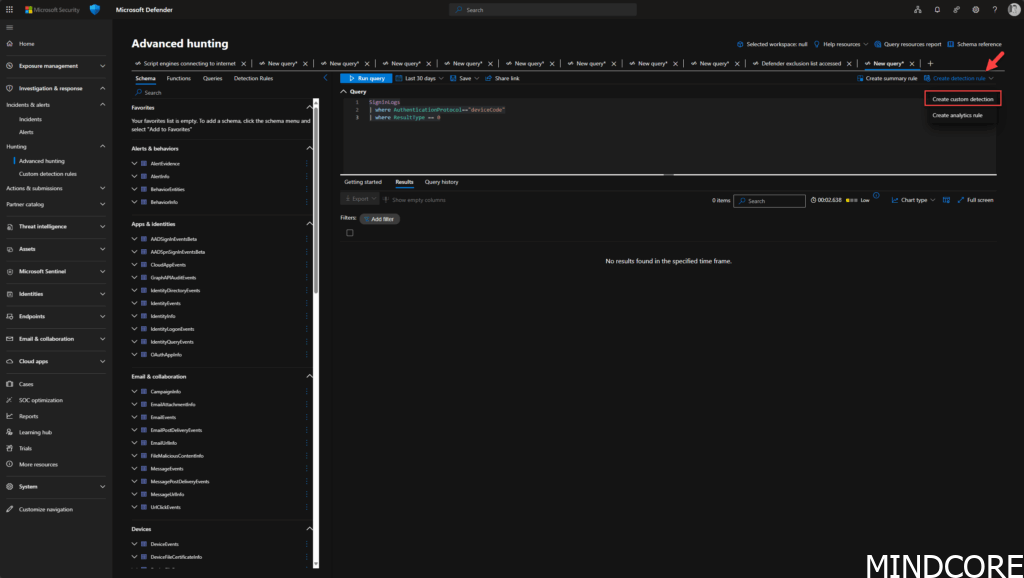
With the query added the query editor, now select Create detection rule in the top right, and provide the following alert details:
- Detection name – A unique name for the detection rule.
- Frequency – The interval at which the query runs and takes action. Refer to the rule frequency section for guidance.
- Alert title – A unique title displayed for alerts triggered by the rule.
- Severity – The potential risk level associated with the detected component or activity.
- Category – The type of threat or activity identified by the rule.
- MITRE ATT&CK techniques – One or more attack techniques linked to the rule, based on the MITRE ATT&CK framework. This section is hidden for certain alert categories, such as malware, ransomware, suspicious activity, and unwanted software.
- Description – Additional details about the detected component or activity.
- Recommended actions – Suggested steps for responders to take in response to an alert.
Follow the wizard:
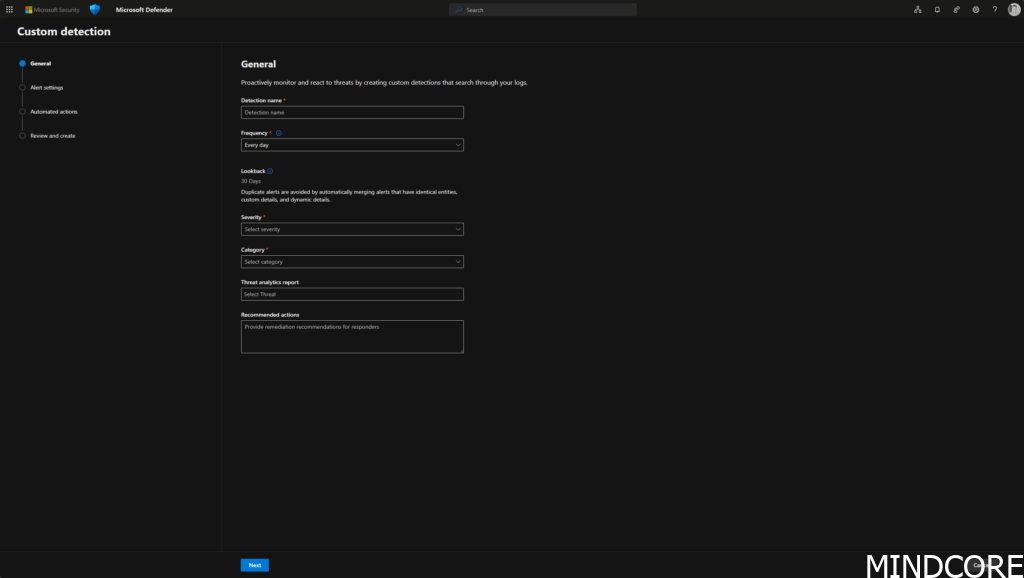
This information helps define the type of detection we are creating and will be automatically added to the incident in the Defender XDR portal. Pretty smart, right? 😉
Second we need to set the rule frequency.
When you create a new rule, it initially scans the past 30 days of data for matches. After that, it runs at fixed intervals, using a lookback period based on the selected frequency:
- Every 24 hours – Checks the last 30 days of data.
- Every 12 hours – Checks the last 48 hours of data.
- Every 3 hours – Checks the last 12 hours of data.
- Every hour – Checks the last 4 hours of data.
- Continuous (NRT) – Runs in near real-time (NRT), analyzing events as they are collected and processed.
Continuous (NRT) frequency – and why?
Setting a custom detection to run on a Continuous (NRT) frequency enhances your organization’s ability to detect threats more quickly. This frequency has minimal to no impact on resource usage, making it an ideal choice for any qualified custom detection rule in your organization.
Why is this cool? It enables near real-time detection, allowing you to respond to threats almost instantly, so you can keep your environment more secure! 🔥
Near real-time detections are supported for the following tables:
AlertEvidenceCloudAppEventsDeviceEventsDeviceFileCertificateInfoDeviceFileEventsDeviceImageLoadEventsDeviceLogonEventsDeviceNetworkEventsDeviceNetworkInfoDeviceInfoDeviceProcessEventsDeviceRegistryEventsEmailAttachmentInfoEmailEvents(exceptLatestDeliveryLocationandLatestDeliveryActioncolumns)EmailPostDeliveryEventsEmailUrlInfoIdentityDirectoryEventsIdentityLogonEventsIdentityQueryEventsUrlClickEvents
For the Alert settings, most time the default is fine, but for now you can leave it like it is.
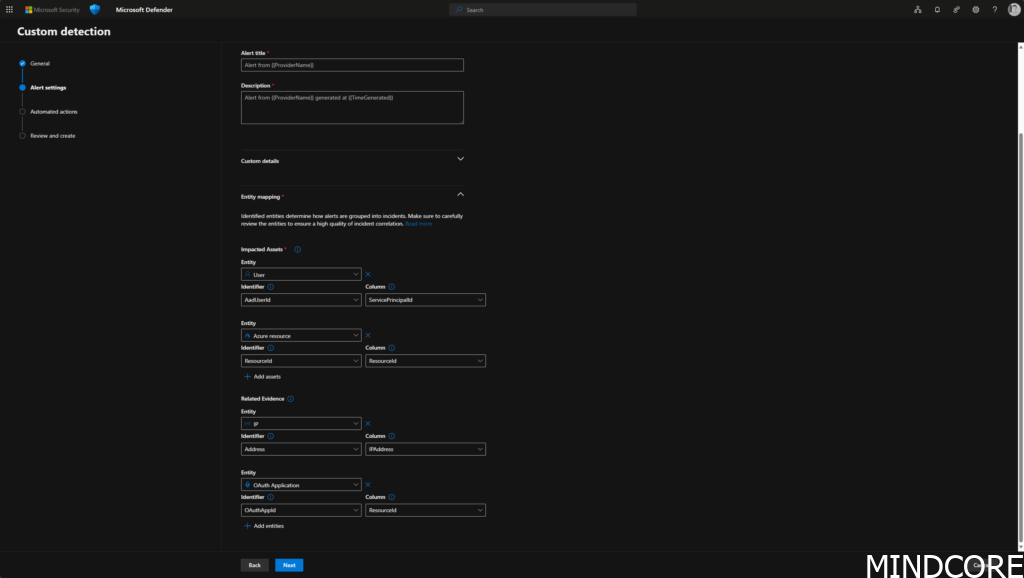
- Click Next
Automated actions
With your custom detection rule, you can automatically take actions on devices, files, users or emails identified by the query. This is a smart approach because it not only streamlines your security response but also reduces the time between detection and action. By automating responses, you can quickly mitigate threats, reduce manual effort, and ensure consistency across your security operations, ultimately enhancing your organization’s overall protection.
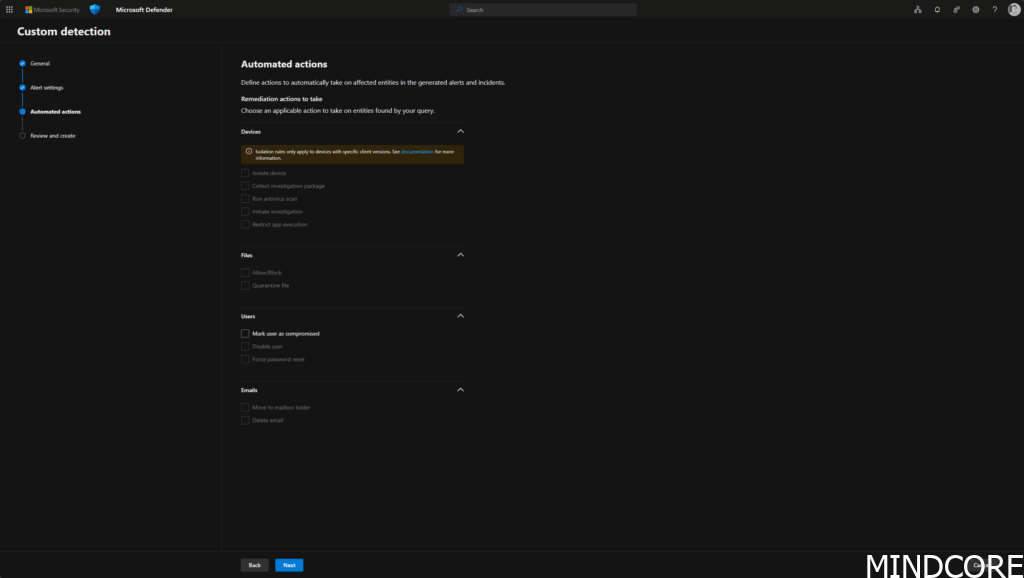
In this example (device code login), you have the option to automatically mark the user as compromised as soon as the event occurs. This eliminates the need for manual intervention.
Click on Next and you will see the Rules overview in Review and create
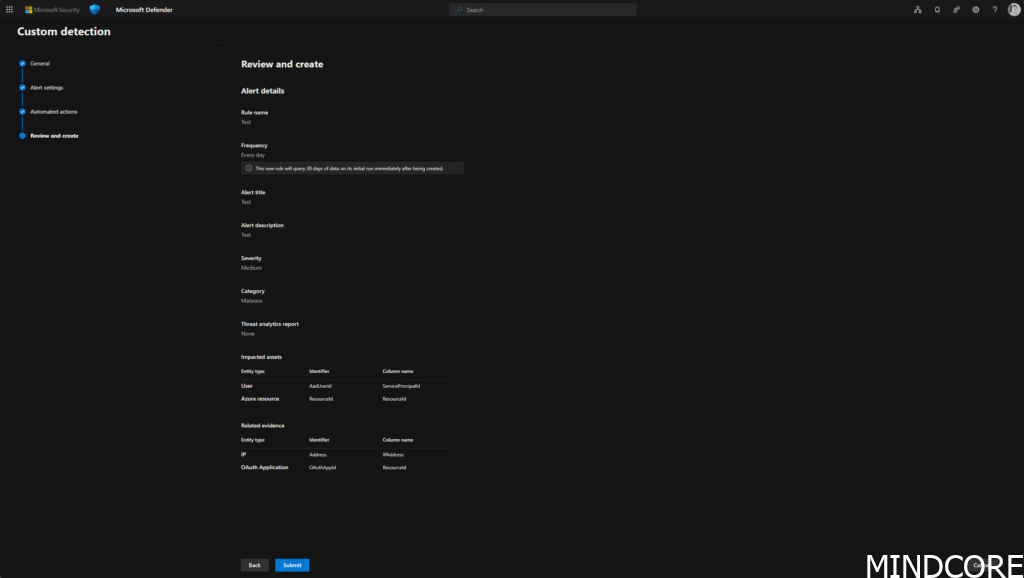
Click on Submit, and the rule will be created under Home – Microsoft Defender > Investigate & Response > Hunting > Custom detection rules.
Some examples
Defender exclusion list accessed
This Kusto Query Language (KQL) query is used in Microsoft Defender for Endpoint (MDE) Custom Detections to monitor process events related to Windows Defender exclusions.
DeviceProcessEvents
| where (ProcessCommandLine contains @"\windows defender\exclusions"
or
ProcessCommandLine contains ".exclusionpath")
Why it’s useful
- Attackers often modify Windows Defender exclusions to prevent security tools from detecting malicious files or processes.
- This query helps detect potential attempts to disable or bypass security by monitoring for commands related to Defender exclusions.
Suspicious Eventlog Clear or Configuration using Wevtutil
This Kusto Query Language (KQL) script is designed for threat hunting in Microsoft Defender for Endpoint (MDE). It specifically detects attempts to clear or modify event logs using three common tools:
- PowerShell
- WMIC (Windows Management Instrumentation Command-line tool)
- Wevtutil (Windows Event Utility tool)
// Detect suspicious Eventlog Clear or Configuration change using Wevtutil
// Can be some risk of FP based on admin access.
DeviceProcessEvents
| where
    (
        FileName endswith "powershell.exe" and (
            ProcessCommandLine contains "Clear-EventLog"
            or ProcessCommandLine contains "Remove-EventLog"
            or ProcessCommandLine contains "Limit-EventLog"
        )
    )
    or (
        FileName endswith "wmic.exe" and ProcessCommandLine contains " ClearEventLog "
    )
    or (
        FileName endswith "wevtutil.exe" and (
            ProcessCommandLine contains "clear-log"
            or ProcessCommandLine contains " cl "
            or ProcessCommandLine contains "set-log"
            or ProcessCommandLine contains " sl "
        )
    )
| union
(DeviceEvents
| where ActionType in ("PowerShellCommand", "RemoteWmiOperation")
| where AdditionalFields contains "clear-eventlog" or AdditionalFields contains " ClearEventLog ")
| where ProcessCommandLine != @"""wevtutil.exe"" sl Microsoft-RMS-MSIPC/Debug /q:true /e:true /l:4 /rt:false"
| where ProcessCommandLine != @"""wevtutil.exe"" sl Microsoft-Windows-PrintConnector/Operational /ms:64000000"
| where ProcessCommandLine !startswith @"""powershell.exe"" -NoProfile -NonInteractive -InputFormat None -ExecutionPolicy Bypass -Command ""& Remove-EventLog -LogName ""Microsoft-FileSync-Agent/"
| where ProcessCommandLine !startswith @"""powershell.exe"" -NoProfile -NonInteractive -InputFormat None -ExecutionPolicy Bypass -Command ""& Remove-EventLog -LogName ""Microsoft-FileSync-Management/"
| where ProcessCommandLine != @"""wevtutil.exe"" sl Microsoft-RMS-MSIPC/Debug /q:true /e:true /l:3"
Why it’s useful
- Attackers often clear event logs to hide malicious activity.
- This query helps detect suspicious log tampering, which is often part of post-exploitation techniques in cyberattacks.
- Security teams can set up alerts based on this query to automatically respond to potential threats
Device Logins
Device Code logins is not recommenced to use anymore, as etc. Storm-2372 conducts device code phishing campaign | Microsoft Security Blog and Block authentication flows with Conditional Access policy – Microsoft Entra ID | Microsoft Learn
To identify any use of this in your organization, use Advanced Hunting in the Defender Portal and the following KLQ:
SigninLogs
| where AuthenticationProtocol=="deviceCode"
| where ResultType == 0
Via this, you can fast and easy see if any login via Device Code flow is failed, or all in total if you remove the | where ResultType == 0 from the abobe KQL Query.
This KQL (Kusto Query Language) query is analyzing sign-in activity to Azure AD over the past 90 days, specifically looking for usage of the Azure Active Directory PowerShell application.
SigninLogs
| where TimeGenerated > ago(90d)
| where AppDisplayName == "Azure Active Directory PowerShell"
| summarize count() by UserPrincipalName
Hunting for legacy use: PowerShell-based authentication (especially older methods like Device Code flow) can be a security concern if not properly monitored or deprecated.
Account creations
This KQL monitoring for local user account creation is an important part of detecting suspicious or unauthorized activity within your environment. Attackers often create local accounts to maintain access, escalate privileges, or move laterally across the network. Thankfully, using Microsoft Defender XDR’s Advanced Hunting feature, you can easily surface this type of activity with a simple KQL query.
DeviceEvents
| where ActionType == "UserAccountCreated"
| project Timestamp, DeviceName, InitiatingProcessAccountName, AccountName, AccountDomain, InitiatingProcessFileName, ReportId
| order by Timestamp desc
This type of query helps your security team quickly identify:
- Unauthorized account creation activity
- Potential attacker persistence mechanisms
- Misuse of administrative tools by insiders or compromised accounts
By alerting on or continuously monitoring these events, you can improve your visibility into user behavior and system changes that may indicate a breach or policy violation.
This KQL monitoring for Local account creation – this can be a red flag in many environments, especially if it occurs outside expected systems like domain controllers or without IT automation tools (e.g., LAPS). Attackers often use local accounts to establish persistence on compromised machines. This KQL query helps you focus on unexpected account creation events by filtering out the noise.
let AllDomainControllers =
        DeviceNetworkEvents
        //| where Timestamp > ago(7d)
        | where LocalPort == 88
        | where LocalIPType == "FourToSixMapping"
        //| extend DCDevicename = tostring(split(DeviceName,".")[0])
        | extend DCDevicename = DeviceName
        | distinct DCDevicename;
// Local User creation
let LapsAccounts = dynamic (["locadm","pcadm"]);
DeviceEvents
| where ActionType == "UserAccountCreated"
| where AccountName !in (LapsAccounts)
| where DeviceName !in (AllDomainControllers)
| where AccountName != "defaultuser1"
🔍 Key concepts
- Domain Controllers Detection:
The query identifies domain controllers by looking for devices listening on port 88 (Kerberos) with FourToSixMapping, indicating a hybrid IPv4/IPv6 setup common in DCs. These are excluded from the results since local account creation on DCs may be expected. - LAPS Accounts Filtered:
Known accounts created via Local Administrator Password Solution (LAPS), like"locadm"and"pcadm", are excluded to reduce false positives. - Other Known Accounts Skipped:
"defaultuser1"—a Windows default placeholder account—is also excluded.
✅ Why this is powerful
By filtering out known and expected activity, this query reduces alert fatigue and helps you focus on truly suspicious account creations. That makes it an excellent candidate for:
- Custom detection rules
- Scheduled threat hunts
- Baseline anomaly detection
It’s a great example of using KQL logic to fine-tune security visibility.
Application Control for Windows
There is also possibilities to use KQL in Defender to detect and get an overview of events based on Application Control for Windows to etc. query the App Control action types summarized by type for past seven days, here you can use this sample:
DeviceEvents
| where Timestamp > ago(7d) and
ActionType startswith "AppControl"
| summarize Machines=dcount(DeviceName) by ActionType
| order by Machines desc
There is also this small query to determine audit blocks in the past seven days etc:
DeviceEvents
| where ActionType startswith "AppControlExecutableAudited"
| where Timestamp > ago(7d)
|project DeviceId,                               // the device ID where the audit block happened
FileName,                                        // The audit blocked app's filename
FolderPath,                                      // The audit blocked app's system path without the FileName
InitiatingProcessFileName,                       // The file name of the parent process loading the executable
InitiatingProcessVersionInfoCompanyName,         // The company name of the parent process loading the executable
InitiatingProcessVersionInfoOriginalFileName,    // The original file name of the parent process loading the executable
InitiatingProcessVersionInfoProductName,         // The product name of the parent process loading the executable
InitiatingProcessSHA256,                         // The SHA256 flat hash of the parent process loading the executable
Timestamp,                                       // The event creation timestamp
ReportId,                                        // The report ID - randomly generated by MDE AH
InitiatingProcessVersionInfoProductVersion,      // The product version of the parent process loading the executable
InitiatingProcessVersionInfoFileDescription,     // The file description of the parent process loading the executable
AdditionalFields                                 // Additional fields contains FQBN for signed binaries.  These contain the CN of the leaf certificate, product name, original filename and version of the audited binary
There are plenty of useful KQL (Kusto Query Language) samples available online, especially on GitHub and sites like KQLSearch.com. Take some time to explore these resources—you might find queries that offer valuable insights or help you solve specific problems faster. It’s a great way to learn by example and expand your KQL toolkit 😎
What happens when a Custom Detection triggers?
Once your custom detection rule is active, here’s what to expect when a match is found:
Microsoft Defender Portal
- An alert will be generated and shown under Incidents & Alerts.
- It will include:
- The alert title, severity, and category you defined.
- A link to the Advanced Hunting query results.
- Details about the impacted entities (devices, accounts, emails, etc.).
- Any automated response actions that were taken (if configured).
To see it, go to Home – Microsoft Defender > Investigate & Response > Incidents & Alerts > Alerts. Here you will see it based on your own detection, what happens, where and to what – here an example where Window Terminal connect to the PowerShell Gallery (sample):
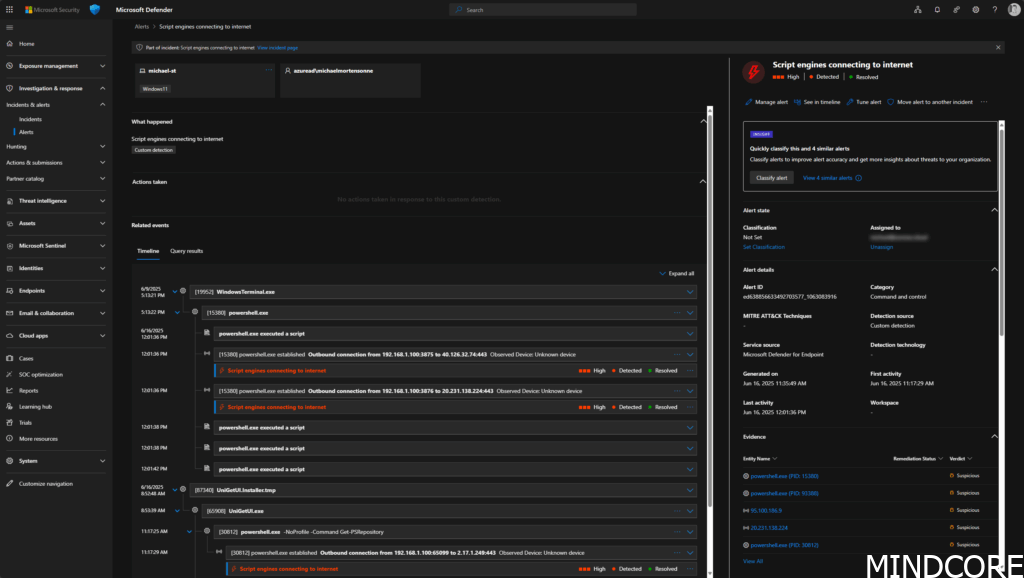
You can investigate the alert further just like any other built-in Defender alert.
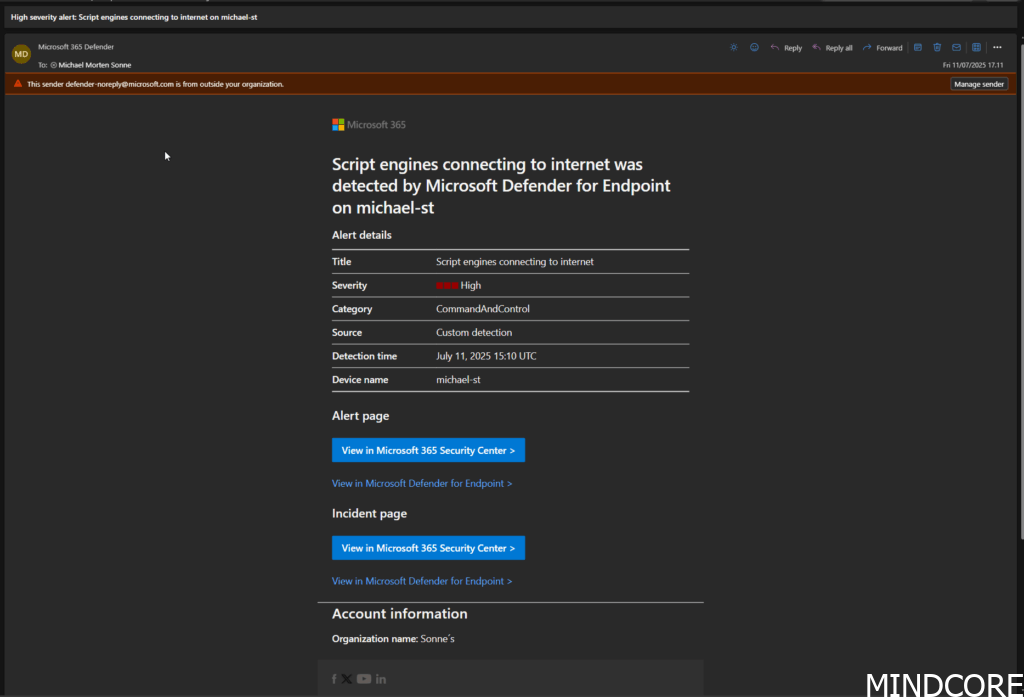
Email Notifications
If you’ve set up alert notifications in Microsoft Defender XDR, security team members will receive email alerts based on the detection rule’s configuration and alert severity. This ensures your team is notified in near real time, even if they’re not actively monitoring the portal.
Tip: You can manage email alert settings under Settings > Rules > Alert notifications to ensure the right people are notified.
Here is a sample of a email alert, triggered by a execution connect to a “not known” domain/external IP (like when Ransomware gets/sending data)
Conclusion
Custom detection rules in Microsoft Defender XDR offer powerful ways to go beyond built-in alerts and proactively secure your environment. Whether you’re monitoring for policy violations, suspicious behavior, or specific threat indicators, these rules allow you to tailor detection to your organization’s unique needs.
By combining advanced hunting with automation, you’re not just reacting to threats—you’re actively hunting them down and accelerating your response. This not only improves visibility and control, but also reduces response time and manual overhead.
Getting started may take a bit of testing and iteration, but the payoff is significant. Start small, refine your queries, and build out a library of detections that align with your environment and risk profile.
🔍 Pro tip: Explore sites like KQLSearch.com and GitHub for real-world query examples, and keep experimenting—you’ll be surprised at what insights you uncover.
References
Overview of custom detections in Microsoft Defender XDR – Microsoft Defender XDR | Microsoft Learn
Overview – Advanced hunting – Microsoft Defender XDR | Microsoft Learn
Kusto Query Language (KQL) overview – Kusto | Microsoft Learn