INFO: This feature relies on the App Access Policies, which are in the process of being replaced by Role-Based Access Control (RBAC) for applications. More information will be shared in an upcoming post about RBAC for Exchange applications.
This is provided for your awareness, so please review and manage it if you are currently using App Access Policies.
Introduction
When integrating applications with Microsoft 365, developers often assign permissions through Microsoft Graph to enable automated processes such as sending notifications, system messages, or workflow emails. One of the most commonly granted permissions is Mail.Send (Application) – a very powerful permission that allows an app to send email as any mailbox in the entire tenant! 🤔😂
Because Application permissions run without user context, they operate with the full trust of the organization. This means that if they are not properly scoped or restricted, they can expose your tenant to significant security and compliance risks.
This post explains why you should always restrict Mail.Send Application permission, what it can access by default, and how to scope it down using Exchange Online Application Access Policies.
Why is the permission Mail.Send so powerful?
The Mail.Send Application permission is extremely powerful. Once granted and consented by an administrator, the application can:
- Send email as any user mailbox
- Send email as shared mailboxes
- Send from distribution groups
- Potentially impersonate executives or sensitive accounts (like send emails out from the CEO´s mailbox)
- Bypass MFA and Conditional Access (application permissions are not user-based)
- Operate without end-user visibility
If an application is compromised – or simply misconfigured – you could unintentionally enable unrestricted mail sending across the entire enterprise. This creates risks such as:
- Phishing sent from internal mailboxes
- Compliance violations
- Data leakage
- Abuse of executive or privileged accounts
- Deliverability issues (spam reputation damage)
This is why it´s recommend to scoping down permissions whenever possible.
By default, when you consent to Mail.Send (Application):
✔️ The application can send email as every mailbox in the Microsoft 365 tenant
✔️ It is not limited by mailbox type
✔️ It does not require user approval
✔️ It bypasses interactive sign-in controls (MFA, CA, user consent)
❌ There are no restrictions until you manually configure them
This default configuration is too broad for most real-world use cases, where an app typically only needs to send email from:
- A no-reply address
- A service mailbox
- Or a specific shared mailbox
This is where Exchange Application Access Policies become essential.
How to get in control of the Mail.Send Application Permission
N.B one of the many good ways to restrict access…
To keep your Microsoft 365 environment secure, you can use Application Access Policies in Exchange Online to restrict which mailboxes an application is allowed to access.
Create a Security Group
This group defines the mailboxes the app is allowed to use.
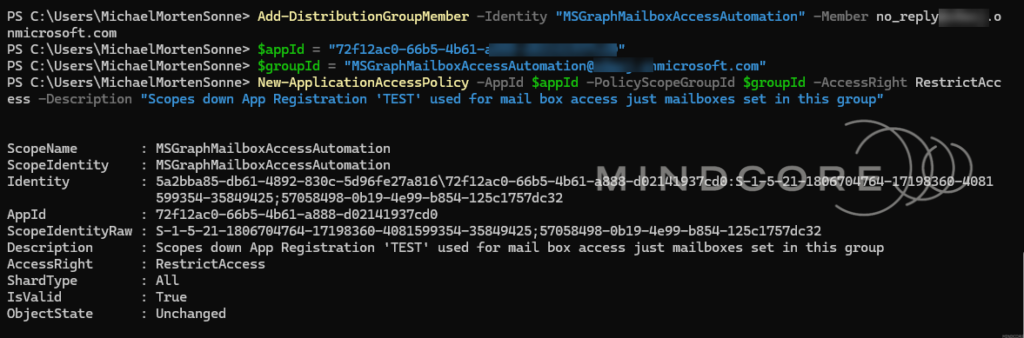
New-DistributionGroup -Name "MSGraphMailboxAccessAutomation" -PrimarySmtpAddress MSGraphMailboxAccessAutomation@domain.com -Type Security
Add-DistributionGroupMember -Identity "MSGraphMailboxAccessAutomation" -Member no_reply@domain.com
This command:
- Creates a new security group (not a regular distribution list)
- Names it MSGraphMailboxAccessAutomation
- Assigns it the email address
MSGraphMailboxAccessAutomation@domain.com - Makes it mail-enabled, so it can be referenced by Exchange and Microsoft Graph
- Allows the group to be used for access control, such as restricting application access to specific mailboxes
In short: this group acts as a container for mailboxes that an application is allowed to access.
Now lets move on to the next part and create the Policy.
Create the Access Policy
- Define the application (App Registration)
- This is the Application (client) ID of an Entra ID app registration
- Identifies which application the policy will apply to
$appId = "3007a224-9497-4fbb-be4d-52093ade6220"- Define the scope group
- This is a mail-enabled security group
- The group contains the mailboxes the app is allowed to access
- Exchange uses this group to determine scope, not individual mailboxes
$groupId = "MSGraphMailboxAccessAutomation@domain.com"- Create the Application Access Policy
- Link the App Registration to the allowed group and make it all happen:
$appId = "3007a224-9497-4fbb-be4d-52093ade6220"
$groupId = "MSGraphMailboxAccessAutomation@domain.com"
New-ApplicationAccessPolicy -AppId $appId -PolicyScopeGroupId $groupId -AccessRight RestrictAccess -Description "Scopes down App Registration 'TEST' used for mail box access just mailboxes set in this group"
Output will be like this:
This command then get it all together and will do this:
- Creates an Application Access Policy in Exchange Online
- Links it to the specified App Registration
- Uses RestrictAccess, which means:
- The app can only access mailboxes that are members of the group
- All other mailboxes in the tenant are blocked
- Adds a description for documentation and auditing purposes
What this means in practice
After this policy is applied:
- The app cannot access every mailbox in the tenant
- It can only access mailboxes explicitly added to the
MSGraphMailboxAccessAutomationgroup - This enforces least-privilege access for applications using Graph or Exchange APIs
If the app attempts to access a mailbox not in the group, the request will be denied.
Test the policy
Now let´s us test the policy. Here we use the application ID from Entra ID earlier and try accessing a mailbox that the application should have access to, as well as one it should not. The results will show whether the policy is being enforced correctly.
Test-ApplicationAccessPolicy -AppId $appId -Identity no_reply@domain.com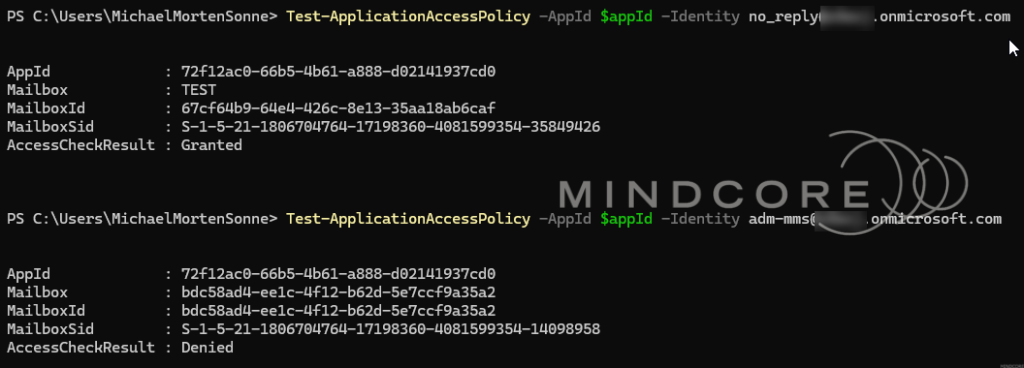
Once configured, Microsoft Graph will block access to any mailbox not in the group, preventing unauthorized sending or impersonation.
Review or Remove Policies
Over time, Application Access Policies may need to be reviewed or cleaned up – this is etc. when an application is retired, its permissions change or access is no longer required.
Where to find the details for the Remove-ApplicationAccessPolicy command
The long Identity string used to remove an Application Access Policy is generated by Exchange, not something you manually create. To get it, you first need to list the existing policies.
- Run the following command in Exchange Online PowerShell:
Get-ApplicationAccessPolicyThis returns all Application Access Policies in the tenant, including:
- Identity (used for removal)
- AppId (the application the policy applies to)
- PolicyScopeGroupId (the group used for scoping)
- AccessRight (RestrictAccess or DenyAccess)
- Description
Identify the correct policy – Run the following command in Exchange Online PowerShell:
Get-ApplicationAccessPolicy | Format-List Identity,AppId,ScopeName,DescriptionThe output will look like this:
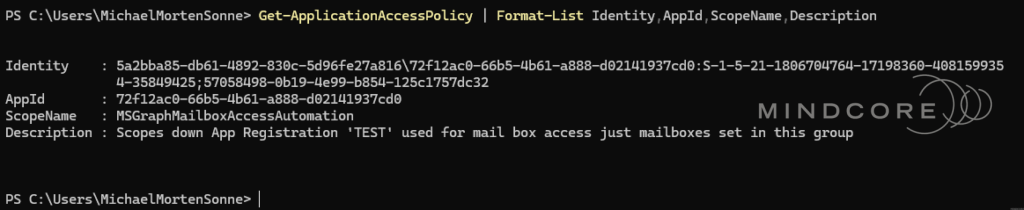
Look for the policy that matches:
- The AppId of your app registration
- The mail-enabled security group used for scoping (ScopeName)
- The description you provided when creating the policy
Once identified, copy the Identity value exactly as shown.
The following command removes an existing Application Access Policy from Exchange Online:
Remove-ApplicationAccessPolicy -Identity "0415ab43-74be-4805-b47c-4b40639385e4\3007a224-9497-4fbb-be4d-52093ade6220:S-1-5-21-2334494376-2102686627-3565270735-53082658;7d8d14fe-25bb-4822-8f7b-c2c491d08a30"Why the Identity looks so complex?
The Identity string contains:
- Internal Exchange identifiers
- The AppId
- Security identifiers (SIDs)
This is expected and normal – you don’t need to understand or modify it, just retrieve and use it as-is.
Use Managed Identities when possible!
If your app runs on etc.:
- Azure Functions
- Azure Web Apps
- Logic Apps
- Azure Automation
- Azure VMs
- Azure Arc
- ….
You can use a Managed Identity instead of a manually created App Registration. Managed identities should be used where possible, as they reduce operational risk by eliminating secrets, simplifying lifecycle management, and improving auditability.
This reduces:
- credential leakage risk
- secret/API key rotation issues
- admin overhead
The same Application Access Policies work with Managed Identities because they use a service principal.
Conclusion
Application permissions in Microsoft Graph are extremely powerful, and you should always handled it with care. Mail.Send (Application) is one of the most commonly misconfigured permissions in enterprise environments, often granted broadly even when an application only needs to send mail from a single mailbox…
Application Access Policies provide a practical way to scope that access. While these policies are being replaced by Role-Based Access Control (RBAC) for Exchange applications, they remain an important control to understand and manage if you are currently using them – and will be out there some time still. If RBAC is the direction you’re heading in, stay tuned for an upcoming post where we’ll dive into that approach in more detail!
By scoping application access to explicitly authorized mailboxes, you significantly reduce risk and improve your organization’s overall security posture – without limiting legitimate automation or business workflows.
As a general rule, always remember to:
- Grant the minimum permissions required
- Restrict application permissions using Exchange Online controls
- Review Microsoft Graph permissions regularly
Mail.Send (Application) is a powerful capability, and with power comes responsibility. The approach shown here is just one way to manage it – but it’s a simple, effective, and governance-friendly option that works well in real-world environments.
If you’re using Microsoft Graph in production – or planning to – treating Mail.Send (Application) as something to actively control, rather than blindly trust, should be a standard part of your security baseline.