Introduction
I was recently tasked to create and roll out a x64-bit Office package, which now is called Microsoft 365 Apps. I spend a great deal of time gathering information to get it as robust as possible and I believe I found a good balance between usability and fast provision of a device also on low bandwidth sites. If you use autopilot or deploy Microsoft 365 Apps, this blog post is for you.
What will this blog post aim for?
- Deploy M365 apps in a smart evergreen way. ✅
- Minimize the bytes downloaded in your provisioning process. ✅
- Reduce footprint on your devices. ✅
- Smarter way to add core language + user specific language without touching a finger. ✅
- Visio follows the version of your Microsoft 365 apps core version. ✅
- Project follows the version of your Microsoft 365 apps core version. ✅
- Make your company M365 apps version ready for Microsoft 365 Copilot. ✅
Initial thoughts
When working with Microsoft Intune it seems to be really easy to get started with your deployment of Microsoft 365 apps. Just go to Apps -> Windows and hit Add and done, right?!

It will work fine for you if you are small company and you can live with the way it works. However I’ve seen a great deal of failure on larger customers while using this method, and I don’t like coincidence when I create solutions for my customers, so I researched further to find a good solution. Came across a fellow MVP’s guide on how he successfully deployed M365 apps here. If you want to know more about the built-in method and why not use it, I recommend reading that blog post first.
But as said, let’s get started on making you a M365 apps awesome deployment experts.
Design
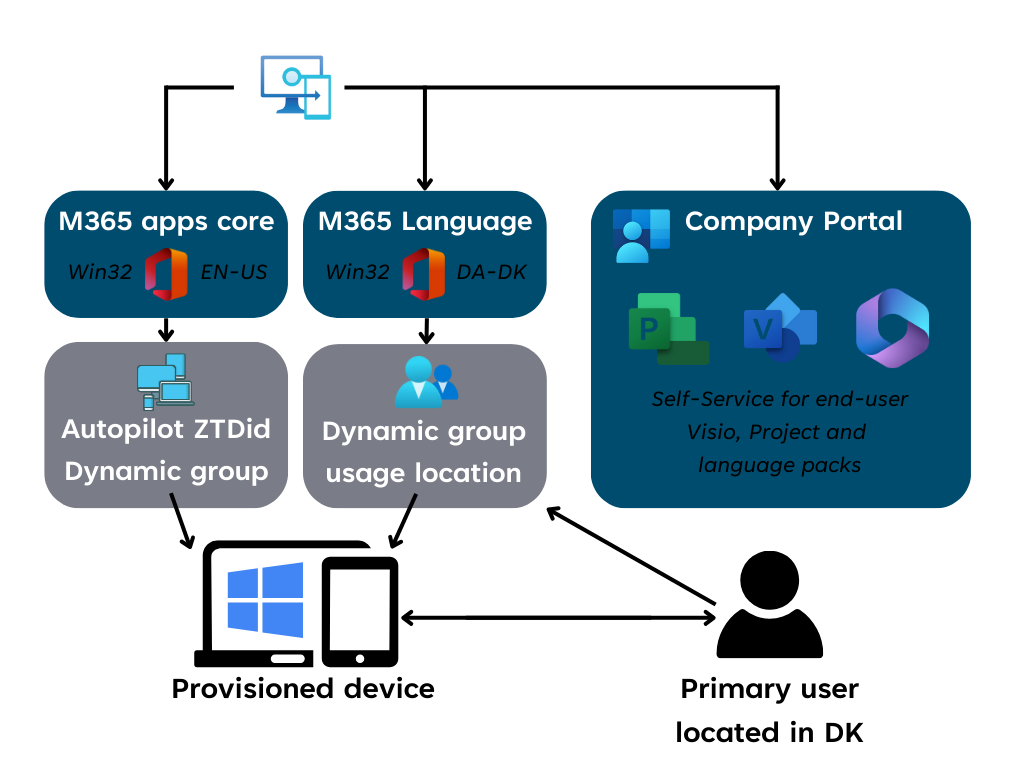
M365 apps core + M365 Language Pack will be assigned as required to the device+user group, resulting in a provisioned device with native English + the UI language of the user.

How to build your M365 apps
One of the classic ways to build apps is to have a complete source. This is referred to as a classic way of deploying M365 apps and works just fine. But it is not evergreen, because you would need to hold this source up to date, and in this blog post I promised evergreen, so no classic for you but great to know how we used to do it. E.g. using setup.exe a config.xml, downloading source files + languages and wupti you would end up with a very large package which easily could go up to 8GB and beyond of source data.
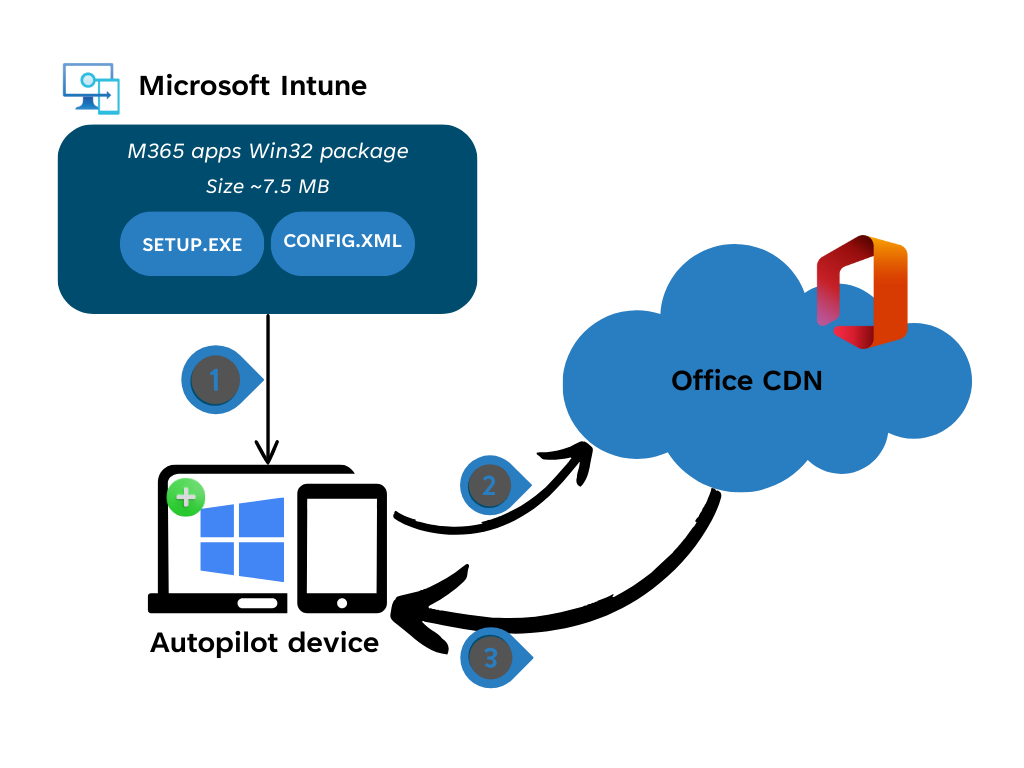
Reducing the footprint:

This drawing shows what components we will use. Setup.exe and config.xml files. The M365 apps data we will dynamically download from Office CDN and let Microsoft handle the release of new binaries for us to use, referred to as evergreen.
Building M365 apps
First we need to get the Office Deployment Tool. You download it here. Save the setup.exe to a folder. I’ll show you later how that looks like.
Next we will build the xml for the package to know what to install.
<Configuration>
  <Add OfficeClientEdition="64" Channel="MonthlyEnterprise">
    <Product ID="O365ProPlusRetail">
      <Language ID="en-us" />
      <ExcludeApp ID="Groove" />
      <ExcludeApp ID="Lync" />
      <ExcludeApp ID="Bing" />
    </Product>
  </Add>
  <Property Name="SharedComputerLicensing" Value="0" />
  <Property Name="FORCEAPPSHUTDOWN" Value="TRUE" />
  <Property Name="DeviceBasedLicensing" Value="0" />
  <Property Name="SCLCacheOverride" Value="0" />
  <Updates Enabled="TRUE" />
  <AppSettings>
    <User Key="software\microsoft\office\16.0\excel\options" Name="defaultformat" Value="51" Type="REG_DWORD" App="excel16" Id="L_SaveExcelfilesas" />
    <User Key="software\microsoft\office\16.0\powerpoint\options" Name="defaultformat" Value="27" Type="REG_DWORD" App="ppt16" Id="L_SavePowerPointfilesas" />
    <User Key="software\microsoft\office\16.0\word\options" Name="defaultformat" Value="" Type="REG_SZ" App="word16" Id="L_SaveWordfilesas" />
    <Setup Name="Company" Value="%your company%" />
  </AppSettings>
  <Display Level="None" AcceptEULA="TRUE" />
  <Logging Level="Standard" Path="%WinDir%\Logs\Software\M365AppsProPlus\" />
</Configuration>
When you combine the Setup.exe with the XML file you have a complete M365 apps x64 package that will pull down the latest binaries from Microsoft in the channel “Monthly Enterprise Channel”. Save the XML together with your setup.exe
Now we need to build an XML for removal as well.
<Configuration>
  <Remove>
    <Product ID="O365ProPlusRetail">
    </Product>
  </Remove>
  <Property Name="FORCEAPPSHUTDOWN" Value="TRUE" />
  <Display Level="None" AcceptEULA="TRUE" />
</Configuration>
Final result: 7.5 MB of data. This is the lowest footprint you can get. This is the amount of data that will be downloaded from Intune to your device while going through autopilot while the rest of the binaries will be downloaded directly from Office CDN as specified on the drawing “Reducing footprint”

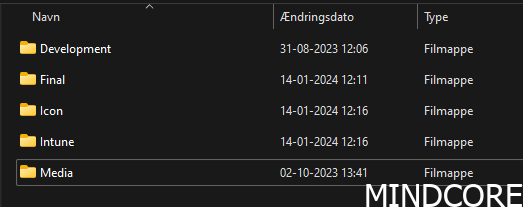
I want to show you, just for inspiration, how to make a folder structure for your Intune apps in general:

- Development – For files you need to build the solution
- Final – for your files that need to be in IntuneWIN.
- Icon – for you icon that needs to go in while creating the Win32 app in Intune
- Intune – for the intuneWin created file.
- Media – for original media and docs like install commands and detection.
Package what is in FINAL into a IntuneWIN file and upload it to Intune as a WIN32 app.
Important information you need while creating the app in Intune:
Install command: setup.exe /configure M365Apps.xml
Uninstall command: setup.exe /configure remove.xml
Detection:
File: C:\Program Files\Microsoft Office\root\Office16
File or folder: WINWORD.EXE
Detection method: String
Operator: Greater than or equal to
Value: 16.0.16529.20226
Important Notice:
Remember to deploy Teams app separate if you have a tenant in Europe.
How to build Visio
Continue with the first steps of the M365 apps guide where you downloaded the Office Deployment Tool. Just reuse the Setup.exe but create a new folder structure for Visio.
Build the XML for the package to install Visio and match the version of the core M365 app.
<Configuration>
  <Add Version="MatchInstalled">
    <Product ID="VisioProRetail">
      <Language ID="MatchInstalled" TargetProduct="O365ProPlusRetail" />
    </Product>
  </Add>
  <Property Name="SharedComputerLicensing" Value="0" />
  <Property Name="FORCEAPPSHUTDOWN" Value="TRUE" />
  <Property Name="DeviceBasedLicensing" Value="0" />
  <Property Name="SCLCacheOverride" Value="0" />
  <Updates Enabled="TRUE" />
  <Display Level="None" AcceptEULA="TRUE" />
  <Logging Level="Standard" Path="%WinDir%\Logs\Software\M365AppsProPlus\" />
</Configuration>
Build an XML for removal.
<Configuration>
  <Remove>
    <Product ID="VisioProRetail">
    </Product>
  </Remove>
  <Property Name="FORCEAPPSHUTDOWN" Value="TRUE" />
  <Display Level="None" AcceptEULA="TRUE" />
</Configuration>
Important information you need while creating the app in Intune:
Install command: setup.exe /configure visio.xml
Uninstall command: setup.exe /configure remove.xml
Detection:
Registry: HKLM\SOFTWARE\Microsoft\Office\16.0\Visio\InstallRoot
Value name: Path
Detection method: Value exists
How to build Project
Continue with the first steps of the M365 apps guide where you downloaded Office Deployment Tool. Just reuse the Setup.exe but create a new folder structure for Project.
Build the XML for the package to install Project and match the version of the core M365 app.
<Configuration>
  <Add Version="MatchInstalled">
    <Product ID="ProjectProRetail">
      <Language ID="MatchInstalled" TargetProduct="O365ProPlusRetail" />
    </Product>
  </Add>
  <Property Name="SharedComputerLicensing" Value="0" />
  <Property Name="FORCEAPPSHUTDOWN" Value="TRUE" />
  <Property Name="DeviceBasedLicensing" Value="0" />
  <Property Name="SCLCacheOverride" Value="0" />
  <Updates Enabled="TRUE" />
  <Display Level="None" AcceptEULA="TRUE" />
  <Logging Level="Standard" Path="%WinDir%\Logs\Software\M365AppsProPlus\" />
</Configuration>
Build an XML for removal.
<Configuration>
  <Remove>
    <Product ID="ProjectProRetail">
    </Product>
  </Remove>
  <Property Name="FORCEAPPSHUTDOWN" Value="TRUE" />
  <Display Level="None" AcceptEULA="TRUE" />
</Configuration>
Important information you need while creating the app in Intune:
Install command: setup.exe /configure project.xml
Uninstall command: setup.exe /configure remove.xml
Detection:
Registry: HKLM\SOFTWARE\Microsoft\Office\16.0\Project\InstallRoot
Value name: Path
Detection method: Value exists
How to build Language packs
Continue with the first steps of the M365 apps guide where you downloaded Office Deployment Tool. Just reuse the Setup.exe but create a new folder structure for Language packs.
Build the XML for the package to install Language Pack it will automatically match the version of the M365 app. In this example I use Danish, but you can build as many as you need by changing the Language ID.
<Configuration>
  <Add>
    <Product ID="LanguagePack">
      <Language ID="da-dk" />
    </Product>
  </Add>
  <Property Name="FORCEAPPSHUTDOWN" Value="TRUE" />
  <Updates Enabled="TRUE" />
  <Display Level="None" AcceptEULA="TRUE" />
</Configuration>
Build an XML for removal.
<Configuration>
  <Remove>
    <Product ID="LanguagePack">
      <Language ID="da-dk" />
    </Product>
  </Remove>
  <Property Name="FORCEAPPSHUTDOWN" Value="TRUE" />
  <Display Level="None" AcceptEULA="TRUE" />
</Configuration>
Important information you need while creating the app in Intune:
Install command: setup.exe /configure LanguagePack.xml
Uninstall command: setup.exe /configure remove.xml
Detection:
Registry: HKEY_LOCAL_MACHINE\SOFTWARE\Microsoft\Windows\CurrentVersion\Uninstall\O365ProPlusRetail – da-dk
Value name: Path
Detection method: Value exists
Assignment of all your apps
Now that you come this far and built all of your apps and tested that they work in your environment, it is time to combine everything so it works nicely as promised at the beginning of this blog post.
Assigning M365 apps core evergreen (the first package we built)
Assignment
Required to Autopilot Entra ID device group.
Entra ID Group Dynamic rule
(device.devicePhysicalIds -any _ -eq “[OrderID]:Autopilot”)
Assigning M365 Language packs evergreen
Assignment 1
Required to Entra ID user group. (preferable with a filter, as it might be that you have more than one device type you logon to.)
Entra ID Group Dynamic rule
(user.usageLocation -eq “DK”)
Assignment 2
Available to all users
Assigning M365 Visio and Project
Assignment 1
Available to all users
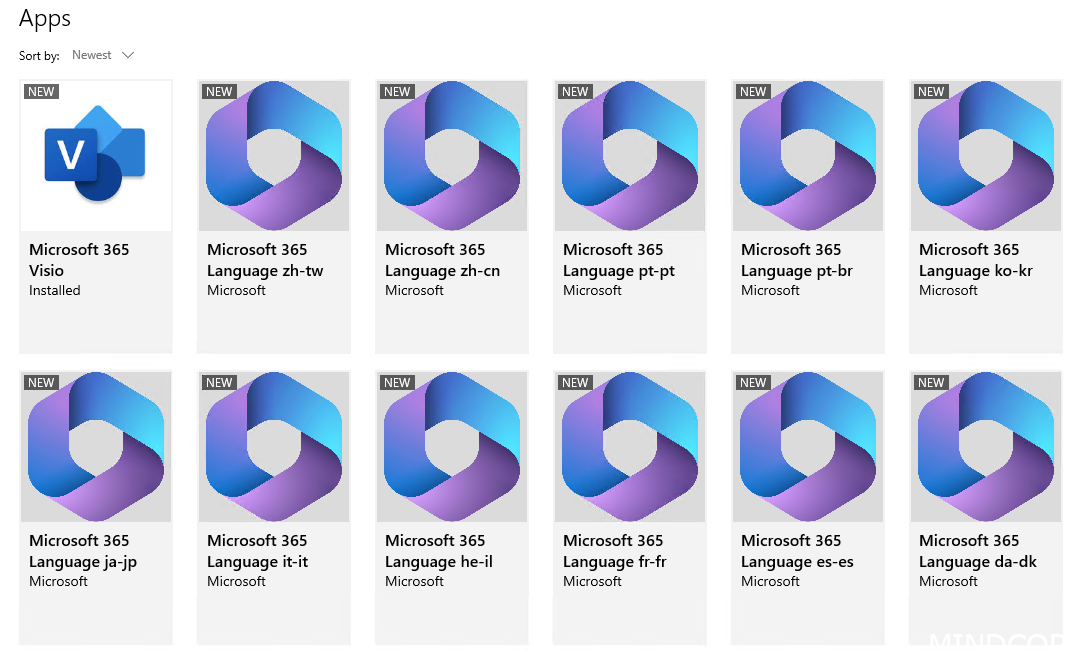
Result: A users view from Company Portal
When one of your users may need more than they got offered by default, they will simply go to the company portal and install one of the available language packs, Visio or Project.
The question you might have. But what if I don’t have a license for Visio or Project? Then it will just work as a viewer until you get the cloud license assigned to your user. That can be fully automated as well, but not part of this guide.

Result: A view from add/remove programs
For a native English user, this would be the outcome of your device after they provisioned and installed Visio as an addition. Visio and Project will follow your core M365 apps version and it will be aligned beautifully like beneath the screenshot.

And here a screenshot of how it would look like with Project.

Summary
And with that, it is time to wrap up for this blog post. I hope you have a good understanding of what it takes to build a robust design of your M365 apps within your organisation. A design that works for small organisations as well as for very large organisations. ONE design to rule them all.
Using the monthly enterprise channel will make you ready for Microsoft 365 Copilot, and it will also qualify you to use e.g. Autopatch which I have very good experience with to ease your patching every month. Are you among the lucky ones with the required licenses, then I’d suggest trying that out!
Happy deployment!
Mattias Melkersen is a community driven and passionate modern workplace consultant with 20 years’ experience in automating software, driving adoption and technology change within the Enterprise. He lives in Denmark and works at Mindcore.
He is an Enterprise Mobility Intune MVP, Official Contributor in a LinkedIn group with 41.000 members and Microsoft 365 Enterprise Administrator Expert.
Mattias blogs, gives interview and creates a YouTube content on the channel "MSEndpointMgr" where he creates helpful content in the MEM area and interview MVP’s who showcase certain technology or topic.
Official Contributor here "Modern Endpoint Management":
https://www.linkedin.com/groups/8761296/


